Wednesday, December 28, 2011

Banana Smoothies x 2


When's the last time you have a banana?  I haven't eaten banana for 9 months after Cyclone Yasi hit Queensland in January this year.  Since I've been living in Australia, this is the second time that mother nature wipes out the banana crops affecting the prices of banana that make you really treasure this tropical fruit!  The first time was Cyclone Larry in 2006 that it took nearly 4 years for the price to go back to normal then this time Cyclone Yasi brought so much rain and plus more rain on the other parts of Queensland causing the devastated Queensland flood at the beginning of 2011.  If the government hasn't allowed the farmers to sell bananas that fall from the ground to keep the supply and prices down, we would not have bananas selling at the shop.  The highest price for the banana has gone up to $15 a kg and thank goodness it has now gone down to $3.

Many people have a tough year in 2011 and I hope that 2012 will bring us good health, peace and prosperity!  And of course, many more yummy recipes!  HAVE A HAPPY NEW YEAR!    

Tropical Banana Treat
1 banana, chopped
1/2 ripe mango, peeled and chopped
100ml fresh orange juice
1 passionfruit fruit, halved

Blend banana and mango with orange juice.  Pour into glass and add the passionfruit pulp and seeds and stir.

Banana and Berry Blast
1 banana, chopped
1/2 cup frozen mixed berries
100ml fresh orange juice
1 teaspoon honey

Blend fruit until smooth and pour into glass to serve chill.

Source: adopted and modified from the cookbook GI high-energy cookbook by Rachel Anne Hill


Sunday, December 25, 2011

Marmalade Glazed Ham and Christmas Feast


Merry Christmas and I hope everyone has a great time with their family and friends.

My challenge for this Christmas is to cook up a traditional feast to overcome my fear of cooking big chuck of meat.  I made this glazed ham and roast a whole stuffed turkey on Christmas Day.  I made the dessert of cream burlee and chocolate meringue terrine on Christmas Eve.  Then I started cooking at 6.30am on Christmas Day making the pumpkin pies, cooked the ham, roast vegetables, mashed potatoes, make the dips, make the fruit salad, heat up the bread rolls, cook the corns and finally roasting the turkey at 9.30am.  I get my kids to help me prepare the appetizer and the feast is all prepared by 12 noon.  My sisters also brought a lot of food along so we just sit and chat and eat the whole day!  And we have SO much left-over that could last for a couple of days or weeks!

So I've done it and I have less fear for cooking big chuck of meat.  My next challenge will be roasting rolled pork loin or leg of lamb.  Then I may claim myself as no fear in the kitchen!

Marmalade Glazed Ham


one leg of ham
whole cloves, to decorate
1 cup orange marmalade
1/4 cup orange juice
1/4 cup brown sugar
pineapple pieces

Method:

  1. Cut the rind about 10cm from shank end of leg.  Run your thumb around edge of rind just under the skin to remove rind.  Carefully pulling rind from widest edge of ham and continually to pull away from the fat up to the cut.  (I did that a day ahead and reserved the rind to cover the cut surface to keep it moist during storage)
  2. Score fat by making shallow cuts diagonally in both directions at 3cm intervals, carefully not cut through the fat.
  3. For the glaze: stir in the orange juice with the marmalade in a saucepan then add the sugar and stir till sugar is dissolved.
  4. Place the ham onto the baking dish, brush with half of the glaze.  Cover shank end with foil.  Place some pineapple at the bottom.  Roast, uncovered in a pre-heated 180c oven for 40 minutes.  Push a clove in centre of each diamond shape and roast a further 40 minutes or until brown all over, brush ham with remaining glaze during cooking.
  5. Cover ham with foil and rest before serving.  Serve hot or cold.


Thursday, December 22, 2011

Mini Cinnamon Donuts


When you have kids around home during holidays, you just have to keep supply them with food.  One day my son asks me to make him some pancake and I'm surprised as he often say no when I want to make it.  (That's the problem when he has a mum that cook a lot and being my guinea pig for taste testing, he eventually got sick of certain food) This time it's me that doesn't want to cook pancake, then he further request waffle and got me rejected again.  But I'm in the mood of making donuts!  My little donut maker has been neglected for so long that I decide to wake it up from its sleep and do some work for me!

I have been trying to add more fibre to our diet so I add in some wholemeal flour for the recipe.  I also add some colour sprinkles for a more festival looking.  The donuts taste the best when they are still warm and we eat so much that there isn't too much room left for lunch!

I'm going to celebrate Christmas this year with all my siblings.  As you get older, it is harder to gather with the whole family.  Christmas provides a very good reason to do so.  Merry Christmas to you all!

Mini Cinnamon Donuts
(make about 40)

1 1/2 cup self-raising flour
1/2 cup whole-meal self-raising flour
1 cup milk
1/3 cup caster sugar
1 tablespoon vegetable oil
1 teaspoon salt
2 eggs, beaten

For coating:
caster sugar mixed with some ground cinnamon
melted butter or margarine
coloured sprinkles (optional)

Method:

  1. Preheat donut maker.  Prepare cinnamon sugar and melt butter. 
  2. Mix all dry ingredients together.  Then add the oil, eggs and milk, stir through mixture until well combine.  Add a little more milk if too thick.
  3. Fill each donut hole with a tablespoon of batter then close the unit.  Bake until the donuts are browned or spongy when press with finger.
  4. Remove donuts from the donut maker.  Dip each donut into butter then into cinnamon sugar. Sprinkle with some coloured sprinkles if you wish.

Friday, December 16, 2011

Corn Chowder, Sun-dried Tomato & Cashews Dip


After having a few hot days, the weather has cooled down and my daughter asks me to make her some soup.  It is only about 20 celsius with a bit of rain and wind but she puts on her tracksuit and keep complaining how COLD it is!  After all these Christmas party food, we need something light like this to help cleansing our system. 

When I went to one of the Christmas party, one of the mum brought in some homemade dip. She had been very generous telling me what she put in.  So I went home and tried to be a copy cat.  She said the dip could also be a salad dressing by adding some lemon juice to it.

The post man knocks on our door and I receive two Christmas parcels the other day, not to mention the greeting cards I have received.  I have to get myself writing some Christmas cards, getting the shopping done, etc. as Christmas is not far away.  I have got a whole turkey and a leg of ham for our Christmas lunch.  I haven't cooked anything that BIG before, and they both need the oven.  I may have to get up early to get these done so they'll be ready on time.  Let's hope there is no kitchen disaster on Christmas Day as there is no take-away open!

Corn Chowder
(serve 4)

1/2 medium onion, chopped
1/2 medium carrot, peeled and chopped
3 small new potatoes, peeled and chopped
kernels from 2 ears of sweet corn
peas (optional)
4 cups water
1 cup low-fat milk
salt and pepper

Method:

  1. Pan fried onion with a little of oil in the saucepan.  Add the potatoes and carrot and continue to fry for a minute.  Add the water, bring to the boil, then reduce the heat and simmer for 10 minutes.
  2. Add the kernels and milk to the saucepan and continue to simmer until potatoes are cooked.  Transfer the soup to the food processor or blender and process until smooth. 
  3. Return the soup to the saucepan, add some peas, season with salt and pepper.  If it's not thick and smooth enough, you can thicken it with a teaspoon of cornflour mixed with a tablespoon of water.

Sun-dried Tomato & Cashews Dip


1/2 cup salted cashews
1/2 capsicum, roughly chopped
1/2 cup sun-dried tomatoes, roughly chopped
lemon juice
salt to taste
olive oil

Blend the cashews with capsicum, tomatoes and olive oil (I use the oil from the bottle of the tomatoes) until smooth, add in some lemon juice and salt.  Serve with crackers.


Thanks for visiting and supporting my blog. 

Wishing you a 


Merry Christmas and Have a Happy New Year!


Wednesday, December 14, 2011

White Christmas Crackles and Chocolate Bark


Living in the southern part of the world means that we are having Christmas in the hot summer!  Apart from traditional food such as turkey and pudding, we often celebrate Christmas with a BBQ.  It is the only time that we close our restaurant for 2 days, so our family would gather together and eat for the 2 whole day.  There is not much to do besides eating and drinking as most of the shops are closed on Christmas Day. Then the big sale will start on boxing day which is crazy to go to the shopping centres to find a car park space.  I'd prefer to stay home or go to the beach.  I do miss the cold weather as we have in Hong Kong for Christmas. The buildings in the Hong Kong city are decorated with neon Christmas lights and I'd like to wear thick coat, just to wondering around, just to breathe the cold air!  I haven't experienced a white Christmas yet, some people celebrate Christmas in July (that's our winter).  Maybe I'd do that one day, making snow man in July while saying Merry Christmas!  

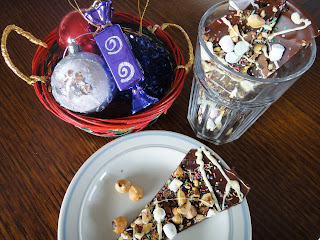
Both of the White Christmas Crackles and Chocolate Bark are Christmas treats for the kids that don't need baking which is a lot easy to prepare for the summer time.  I like to close my eyes while biting onto the crackles and let the sweetness of the white chocolate infuses with the marshmallow rice crisps.  My son has chocolate all around his mouth after having the chocolate bark as it melts on his hands very quickly and gone messy!

White Christmas Crackles
(make 12)

2 cups rice bubbles
1 cup white marshmallows
50g butter
white chocolate, melted
coloured sprinkles
smarties

Method:

  1. Melt butter and marshmallows in a small saucepan under low heat until smooth.
  2. Pour the marshmallow mixture with the rice bubbles and stir well.  Spoon into patty cases and let it set for 10 minutes.
  3. Pour melted chocolate over the top and sprinkled with coloured sprinkles then top with smarties.  Keep in the fridge until all set.
Chocolate Bark

1 block of dark chocolate, melted
white chocolate, melted
roasted hazelnut, roughly chopped
coloured sprinkles
crunchie bar
mini marshmallow

Method:
  1. Crush the crunchie bar with a rolling pin. 
  2. Spread melted chocolate onto a baking try lined with foil or baking paper to a thin rectangular shape. Sprinkle with crushed crunchie bar, hazelnut, sprinkles, marshmallow and then drizzle with white chocolate and leave to set in the fridge.
  3. Cut chocolate bark into round, triangular or square shape.   
My daughter makes these sugar cookies and we decorate them together.   We should leave some to Santa on Christmas Eve!

Saturday, December 10, 2011

Rustic Caramelized Peach Tart


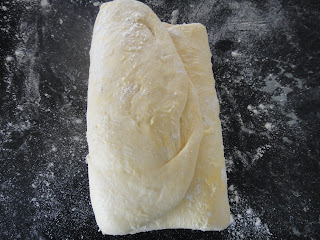
This peach tart is the front cover for the cookbook written by Maxine Clark.  I made her strawberry vanilla tart a few months ago when strawberry is in season.  I don't think that tin peach would taste the same as the fresh one so I wait till the peach season arrives to make this French style tart.  I chose to make the pastry using the cheat's rough puff pastry method by grating frozen butter onto the flour before folding.  The best part of this tart is the crispy buttery crust and the sugary caramelized peach syrup.  It's a simple form of tart that doesn't need any special tart tin but you need the skill to fold the pastry.  And I could tell you that it worths the effort!  I could image myself sitting at the veranda with red and white checkers tablecloth looking at the rural view from the French farm while sipping a cup of tea.  It's so simple and so good.  

Rustic Caramelized Peach Tart


Pastry:
250g plain flour
a pinch of salt
150g unsalted butter. frozen
150ml or a bit more iced water

Filling:
4-6 ripe peaches
55g butter
juice of 1/2 lemon
150g caster sugar
whipped cream or creme fraiche, to serve


Method:

  1. For the pastry: Sift flour and salt in a mixing bowl.  Hold the butter in a tea towel (I use glad wrap) and quickly grate the butter into the flour.
  2. Stir the butter into the flour with a knife.  Pour in water and mix with knife again until a messy lump is form.  Add a bit more water if needed.
  3. Knead until it forms a streaky, lumpy ball.  Wrap with glad wrap and chill for 30 minutes until firm.
  4. Sprinkle some flour onto the kitchen bench or work on a piece of baking paper.  Unwrap the dough and roll out away from you into a long rectangle 3 times longer than it's wide with 1 cm thick.  Remove any excess flour on the surface with a brush.
  5. Lightly mark the pastry into 3 equal parts with knife then fold the 3rd closest to you over the middle and then fold the top third to cover the folded parts.
  6. Turn it anticlockwise 45 degree like a book shape, then mark at one edge with finger to indicate you have completed 1 roll, then repeat the rolling and folding once more.  Rewrap and chill for 15 minutes.
  7. Repeat rolling and folding twice more then wrap and chill for 30 minutes ( I chill for 15 mins) before rolling into shape.
  8. Roll out the pastry and cut into a circle with 28cm in diameter about the size of a large dinner plate over baking paper.  Twisting the pastry over itself to make the edge.  Press slightly to seal and transfer onto a baking tray and chill for a further 15 minutes.
  9. For the filling: Halve and pit the peaches and cut into chunky slices.  Heat butter in a saucepan the add the lemon juice and 1/2 sugar.  When the butter and sugar melted, add the peaches and toss gently.  Pile the peaches over the pastry with some butter sugar sauce and sprinkle the remaining sugar.  Bake at preheated oven at 230c for 20-25 minutes or until golden, puffed and caramelized. Serve with cream.
Source: adopted from the cookbook, Tart - sweet and savoury by Maxine Clark


Tuesday, December 6, 2011

Mini Cream Horns & Palmiers with Honey Cream

cream horns with honey cream and nutella cream

What a start off for the summer holiday with rain!  It has been raining for a few days and the kids are feeling bored staying indoor (they may not be that bored if I haven't restricted them to use computer for only 2 hours a day!) So we head into the kitchen and look for things to make.  We have some frozen puff pastry and cream, and I have these cream horn moulds and some very large strawberries. The first batches of the cream horns and palmiers were gone in a flash as we were so hungry and they tasted so delicious.  My daughter made her palmiers with white chocolate and caster sugar from the recipe she learnt at school and I put in nutella with whipped cream for the cream horns for something different.


Mini Cream Horns

1 sheet of puff pastry, thawed
1 egg, beaten
thicken cream, whipped
honey
nutella
strawberries
icing sugar for dusting

Method:
Cut pastry into 12 strips about 2cm wide.  Lightly grease the mould, then starting rolling the pastry onto the mould starting from the points of tins.  Place horns on baking tray lined with baking paper and brush them with egg.  Bake in hot oven till puff up then reduce to moderate until horns are lightly browned and crisp.  Pipe in honey cream or nutella cream, dust with icing sugar and garnish with strawberries.

For honey cream and nutella cream: add 1/2 teaspoon of honey to 1/3 cup whipped cream and add 1 heap tablespoon of nutella to 1/2 cup whipped cream.


Palmiers with Honey Cream

1 sheet of puff pastry, thawed
raw sugar
ground nutmeg
honey cream

Sprinkle sugar and nutmeg evenly over the pastry, loosely roll one side at a time into the middle until both sides meet.  Sprinkle extra sugar onto the bottom of the pastry as you roll up so that both sides are coated with sugar.  Roll the pastry over to form a log shape. Cut pastry into 5mm thick pieces.  Place the cut side up with a V-shape onto the baking tray lined with baking paper.  Bake at hot oven for 15 minutes or until golden brown.  Serve with honey cream.


white chocolate palmiers
My daughter made this for her art project. Couldn't stop hugging it!

Monday, December 5, 2011

Easy Chicken and Potato Casserole


It has been a year since my mother-in-law visit me last December.  I am still trying to finish the food she left behind. (I'm not joking!) It's really the love for her to show that she cares about us but it could be quite a challenge for me to use her ingredients as we have different cooking skills.  I have a few packets of this Continental Spaghetti bolognese powder mix that she left behind and I have made several pasta dish from that already.  In fact, I hardly buy any powdered food like this as I reckon they are space food for the astronaut.  While I'm living on earth, I would prefer to make my own sauce or use the bottle/tin instead.  So I end up putting it into a casserole, my very own "space casserole."

I have tried many western style casserole but the only one that my husband will eat is the apricot-chicken that also use powdered food (French onion soup).  He just doesn't like the taste of canned tomato in casserole, so I put in his favourite tomato sauce (ketch-up) for this casserole recipe.  Even though it is not quite that typical kinds of a casserole, I finally got him to love casserole after all this trial and error.  Waiting for him to tell me what he thinks feel likes waiting for my report card.


Chicken and Potato Casserole
(serve 3 - 6)
6 chicken drumsticks
1 medium carrot, chopped
1 small onion, chopped
2 medium potato, chopped (about 2cm)
1/2 packet (25g) of the Continental Spaghetti Bolognese
1 teaspoon of garlic mince 
1/2 cup tomato sauce
1 1/3-1 1/2 cup water
3 tablespoons plain flour
1/2 teaspoon salt
pepper
a handful of frozen pea
a handful of shredded cheese

Method:
  1. Preheat the oven at 200c.
  2. Marinate chicken with salt and pepper and set aside for 20 minutes.  Then coat chicken with plain flour.  
  3. Heat oil in pan, pan fry chicken until the skin is evenly brown.  Set aside.
  4. Heat oil in casserole, stir in onion and then garlic.  Add in chicken, carrot and potato and stir for a few minutes with medium heat.  Then add the spaghetti bolognese powder mix, tomato sauce and water.  Keep stirring until it is well combined. 
  5. Finally add the peas and cheese.  Close the lid and bake in the oven for 50 minutes to 1 hour.  Take the lid off after 35 minutes and bake uncovered for the last 15-25 minutes.  If it gets too brown but the potato is still not cooked, cover it with the lid again and bake until it is cooked.
Note: Do not cut the potato too big as it will take longer time to cook.


It's always excited to put up the Christmas tree than put it away.  Some of our neighbours have their houses decorated with outdoor light and Christmas decoration.  We like to drive along and looking at them every year to pick our favourite one.  Besides the celebration of the born of Jesus, Christmas is also the time for giving, to show our love and care to our family and friends as well as to the needed.  I made this tea cosy for my daughter's friend as she wants to show the appreciation of her friendship.  We are having secret Santa this year for the kids, each kid will buy a present for a cousin (that is picked by random) and also receive a present from another cousin.  I hope this can be a tradition in my family and leave good memory for the kids.   


Wednesday, November 30, 2011

Crispy Rice Chocolate Christmas Tree and Cupcakes


December is the month full of parties and celebration, there are parties for school, for work and for family and friends.  The host usually ask their guests to bring along a plate to share and we simply have a good time together.  I'd much prefer homebake treat rather than buying from the shop because it is unique and most of the time it tastes a lot better!  I also like to receive comments from other people and that helps to bring up the conversation at the parties.  If you haven't got much time to prepare a treat, this Crispy Rice Christmas Tree is the one for you.  There is no baking, just melt the chocolate and mix it with the rice bubbles. (Who wants to turn on the oven when it's already 30c) It does need a bit of a skill in making the layer but it has very simple steps that a kid can easily master that.  If that's too much, you can simply spoon the rice mixture into muffin cases and sprinkle some lollies, sprinkles, coconut and marshmallow on top.  My kids are taking these to school for their break-up parties then they will start their summer holiday.  We are going to put up the Christmas tree and lights around the house this weekend to begin the celebration of Christmas!


Crispy Rice Chocolate Christmas Tree and Cupcakes


300g milk or dark cooking chocolate (I put in 100g milk and 200g dark)
1 1/2 cups Rice Bubbles
3/4 cup desiccated coconut

For the decoration:
smarties
coloured sprinkles
marshmallow
extra coconut for cupcakes

Method:

  1. Melt chocolate in a microwave safe bowl for about 3-4 minutes on medium heat.  Stir till chocolate  is melted.
  2. Add in Rice bubbles and coconuts and stir till combine.
  3. Line two trays with baking paper.  Spoon mixture into a cross shape.  You will need 6 crosses in graduating sizes.  Sprinkle with coloured sprinkles and smarties.  Chill in the fridge for 1 hour or until the chocolate is firm.
  4. To assemble the Christmas tree: place the largest cross on the bottom of the serving plate, spoon a little of melted chocolate in the centre to secure it.  Then sit the next cross on top.  Repeat the procedure for the remaining crosses.  
  5. Cut a large marshmallow into star shape with a pair of scissor to put on top of the tree.
  6. For the cupcake, spoon the mixture into muffin cases and sprinkle with smarties, marshmallow, coconuts and coloured sprinkles.


Tuesday, November 29, 2011

S'more Cupcakes


This is the quickest and easiest cupcake I've ever come across to (not the prettiest one though because of my poor cooking skill, I have seen some very nice S'more cupcake from other bloggers) It is just a sandwich of cookies with a layer of melted chocolate and topped with marshmallow with some cake decoration.  S'more cupcake or biscuits bar is originated from America which is a popular campfire snack made from a sandwich of Graham Crackers with melted chocolate, nuts and toasted marshmallow.  It's a quick fix for the craving for something sweet in less than 20 minutes.

December is approaching and the crowd waiting for the shops to open in the morning is getting bigger and the Christmas spirits is rising with parties and celebration.  I went to celebrate Thanksgiving with my American friend and got to understand more about this celebration.  It is the celebration of harvest with a big feast.  We had turkey, stuffing, ham, mash potatoes, corn and bean followed by pumpkin pie for dessert.  My friend introduced me to pumpkin pie last year and I made these little pumpkin tartlets for her party this year.  Of course her's taste better but I have lots of fun making these tartlet and the pastry is good, too.


S'more Cupcakes
(make 12)

24 digestive biscuits or Graham Crackers
milk or dark cooking chocolate
marshmallows

Decoration:
toasted coconut
coloured sprinkle
pistachio nuts
chocolate balls

Method:

  1. Line 2 baking trays with baking paper.  Lay 12 biscuits onto the trays or place them into a big muffin tray with paper case if it fits in.  Add pieces of chocolate on top and then lay another layer of biscuits on top.
  2. Bake at 160c oven for about 7 minutes or until the chocolate has melted.  Remove the tray from the oven and cool slightly.  Push the biscuits down to secure a bit.
  3. Place some marshmallow on top of each cupcake and bake for further 10 minutes or until the marshmallow brown slightly.  Leave cool slightly, then decorate the cupcake with toasted coconut with pistachio, sprinkles or chocolate balls.  Enjoy the cupcake while it is still warm!

 Source: adopted and modified from the cookbook 500 cupcakes from Fergal Connolly


Monday, November 21, 2011

Birthday Pizza Cookies


I made this pizza cookies for my son's birthday.  We invited a few of his friends for a sleep over party, we had pizza and pasta followed by these cookies.  The boys came to our house with big bags, not full of clothes but full of water guns and toy guns that they had so much fun playing that they don't need much of a sleep.  

This cookies is inspired by the Betty Crocker Cookie Book.  If you don't want to bake, you can use store bought sweet cookies then ice the cookies with frosting and decorate with some chocolate and lollies for small pizza.  It will be a crowd pleaser at any kids party!


Birthday Pizza Cookies

1/3 cup caster sugar
1/3 cup brown sugar
1/2 cup butter, soften
1 teaspoon vanilla essence
1 egg
2 cups plain flour
1 teaspoon baking powder
1/2 teaspoon salt

For the frosting:
100g dark chocolate
1 tablespoon butter
1/2 cup icing sugar
4 tablespoons or more milk

For decoration:
mini marshmallow
smarties
white chocolate, melted

Method:
  1. Preheat oven at 180c.  Beat sugar, butter, vanilla together until creamy.  Add egg and stir in flour and baking powder.  Cover the dough with plastic wrap and refrigerate until firm.
  2. Roll dough to the base of the pizza pan or shape dough into small round shape for small pizza.  Bake about 30 minutes or until the cookies is golden brown.  Cool cookies at wire rack.
  3. For the frosting: melt chocolate and butter in a small saucepan under low heat.  Add in sugar and enough milk to make a smooth paste.
  4. Use a knife to spread frosting to cool cookies.  Then top with marshmallow and smarties.  Drizzle cookies with melted white chocolate.  Keep cookies in tin to retain freshness.


Monday, November 14, 2011

Marmalade Almond Muffins


When I was flicking through my recipe books for my weekly bake, I found this recipe that would use up the marmalade I made a while ago.  I have changed the almond flakes into almond meal and half the flour with wholemeal flour to make this zesty muffin packed with fibre.  If you're tired of having marmalade on toast, why not making this for breakfast with a cup of coffee?

Summer is coming in December but the temperature has already reached 30c.  I am really looking for the summer holiday to take the kids to the beach or just hide myself in the air-conditioner room while having hot curry!


Marmalade Almond Muffins
(make 12)

1 cup self-raising flour
1 cup wholemeal self-raising flour
125g butter, chopped
1 cup almond meal
1/2 cup caster sugar
1/2 cup orange marmalade
2 eggs
1/2 cup milk
almond flakes for extra topping

Marmalade Syrup:
1/4 cup orange marmalade combine with 2 tablespoon hot water

Method:

  1. Preheat oven to 200c.  Place muffin paper cases into muffin tin.
  2. Sift the self-raising flour into a bowl and then add the wholemeal self-raising flour.  Rub in butter with finger tips to the flour.  Stir in sugar, eggs, almond meals, marmalade and milk.  Sprinkle extra almond flakes on top.
  3. Bake in the oven for 20-25 minutes or until the skewer comes out clean when inserted into the muffin.  Brush warm muffins with the marmalade syrup.


Wednesday, November 9, 2011

Almond Crisps


I had the draft of this cookies in my blog for a while, I actually made this in winter when it is was cold and the butter took so long to soften.  I ended up beating it with sugar in a double boiler with hot water to speed up the process.  It is really buttery and crispy like the Danish cookies and it is a perfect thing to go along with a cup of tea.  When I was living in Hong Kong, our relatives usually give us tins of Danish Cookies for Chinese New Year.  And in Australia, those Danish cookies can only be seen around Christmas time.  There are about 7 weeks to Christmas and 3 more weeks for the school ended for a long summer holiday.  With the preparation for Christmas and end of the year activities at school, life couldn't be busier at this time of the year! 
   
Almond Crisps


Ingredients:
125g butter, softened
1/4 cup caster sugar
1 cup self-raising flour
1/4 cup almond meal
2 tablespoons flaked almonds

Method:

  1. Preheat oven to 200c/180c fan-forced.  Line baking tin with baking paper.
  2. Beat butter and sugar in a mixing bowl with electric mixer until smooth.  Stir in flour and almond meal.
  3. Roll level tablespoons of mixture into balls, 5cm apart.  Flatten slightly with a fork.  Sprinkle with flaked almonds.
  4. Bake about 10 minutes or until brown.  Cool on wire rack.
Source: adopted from Australian Women's Weekly - Mix -Cakes, Muffins, Biscuits + Pudding


Saturday, November 5, 2011

Prawn Salad with Mango Mayonnaise


I made this salad a year ago before I started blogging.  I had this friend travelled a lot for work and he took some photos of the food he had when travelling first class in the plane.  The food served at first class was much better than the one I had when I travelled economy class.  As I probably don't have the chance travelling first class so I start making the dishes from his photos and  start cooking more and more western style food until I decide to challenge myself and start blogging about food.  Although I still haven't had the confidence in handling big chuck of meat such as roast leg of lamb and roast turkey etc., I am having more experience in using herbs and trying out new recipes.  What I like about this salad is that I do not put any salt and sugar into it and it tastes so fresh and natural.  My husband bought a tray of mango home the other day and I'd just love to make this salad again!

Prawn Salad with Mango Mayonnaise


fresh raw prawns
green salad
avocado
1 mango (1/2 sliced, 1/2 leave for mayonnaise)
1-2 tablespoons low fat mayonnaise
olive oil
paprika
pepper

Method:

  1. Remove heads and shell from prawns, use a toothpick to remove the poo vein.  Heat oil in pan and pan fried the prawns until cooked, season with some pepper and paprika. 
  2. Arrange salad onto the plate with mango and avocado then topped with cooked prawns.  Drizzle with some olive oil if wished. 
  3. For the mayonnaise: Cut mango into dice and blend it with mayonnaise into a blender until smooth.  Drizzle the mango mayonnaise over the salad. 


Wednesday, November 2, 2011

The Success of the Fundraising for Breast Cancer


I couldn't hold my tears when the principle at school announced at the assembly that we had raised over $1000 in only ten days for the Pink Luncheon to raise fund for breast cancer.  It was my first time organising fund raising for charity and I was overwhelmed with the supported from the school, customers from the restaurant, local businesses and the girls from the netball club.  On the day of the luncheon, we had only about $600 raised (which had already hit our target of $500) then 31 people turned up and they generously purchased multi-draw raffles tickets and buying merchandises from the Pink Box.  My cupcakes was a hit as well.  Everyone had a wonderful time and a nice meal was served by my chef husband.  The guests wrote little supporting messages for their family and friends that had suffered from cancer and we put those messages onto our wall to memorise them.  They also signed for the painting which was painted by the close friend of my other organiser who had recovered from breast cancer.  It's a pleasure to see the guests winning the prizes from the raffles and enjoy a great time together for a good cause.  For $1200 raised, it can help to fund 3 days of research into a rare type of breast cancer and that's a small step closer to the cure!  After a month of organising the event, my husband and I went to bed feeling so happy and good for what we had achieved.  I am looking forward to get involve with the biggest morning tea and relay for life next year and hopefully we can help other people suffering from cancer and keep fighting for them!

In order to say thank you to one of the group of ladies coming to the luncheon, I baked this choc chip cookies for them.  It's my daughter's famous recipe that she baked it for charity and gift for our family most of the time.  My husband and my son both have the same expression when they eat the cookies, it's mmmmmm like a heaven to them.  Because it's her special recipe, I have to keep it as a secret!