There are a lot of things to celebration this year. Earlier this year, my husband and I celebrated our 20th Wedding Anniversary. It was a big milestone for my husband and I that we had been going through so much especially the past 5 years. We had become a better couple and learnt from each other and I hoped we would have many more years of happiness to come.
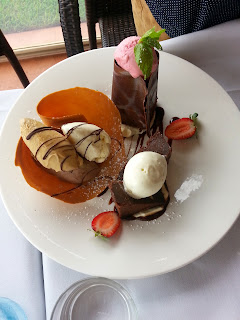 |
| This is the dessert we have at the anniversary. It's called "Death by Chocolate" |
Then not long ago, our first child turns 18. It was so nice to have her to come home to celebrate with us. At this age, she could choose to have party with friends and she was also in the middle of busy uni life and I'm grateful that I could sing "Happy Birthday" to her and spend a lovely weekend with her.
 |
| This is a 3 layer nicked cake with the flavour of white choice, dark choc and strawberry |
My mother is also turning 70 this year! She is a hard working woman and a very devoted wife. My mother has taught me a lot and she has been a role model for me to be a good wife and a caring mother. I wish her good health and enjoy her golden years with lots of love.
 |
| Mum's Birthday Cake |
So here is July, the celebration of my 5th years of blogging and 5 years survival of my first cancer. This blog helps me to going through the tough time and allowing me to meet many talents people that love cooking. It is also a memory keepsake for me to explore different types of cooking. Although I always get trapped by cakes recipes, I am a happier cook for good health and for the happy soul.
It would be great to have a high tea for celebration to thanks for your support!
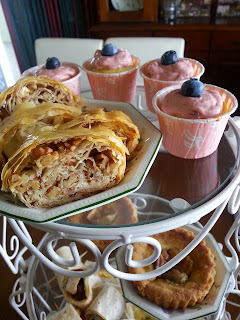 |
| 1st layer Baklava and Berry Sponge Cupcakes |
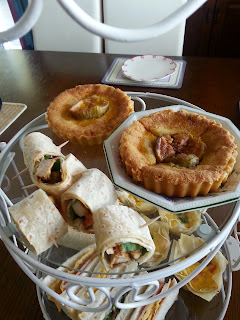 |
| 2nd layer - Chicken & Salad Wrap and Honey Roast Almond & Fig Tart |
I don't believe every journey should have an end but it does need a rest sometime for reflection or branch out for other interests. There are many reasons for me to take a rest, a possible of 2 -3 years, as I want to enjoy my time with my kids and support them before they advance into the big big world. I want to practise more yoga and exercise to keep a healthy mind and body and honestly I just want to eat the food and not thinking of taking picture of it. However I'm not gone, I will still read your post and keep in touch sometime! So keep blogging!
I will be posting picture at Instagram (veronsnapshot) and my personal blog at Facebook (Veronica's Kitchen) regularly and you can follow me there to keep in touch.
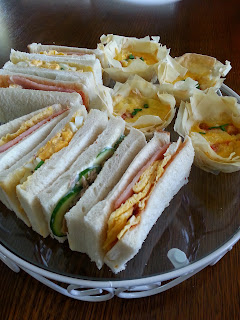 |
3rd layer - assorted sandwich and egg & tomato tart
Thank You for the friendship and support over the years! |
(the Baklava and egg & tomato tart are repost)
1st Layer
Baklava
Make 6 pieces
Ingredients:
15 sheets filo pastry
(about 23cmx23cm), thawed
2-3 tablespoons of butter,
melted
1 cup walnut, finely
chopped
3/4 teaspoon cinnamon
2 tablespoons sugar
Honey-lemon Syrup:
1/4 cup sugar
1/4 cup water
2 tablespoons lemon juice
2 tablespoons honey
Methods:
1. Line the non-stick baking paper onto the tray.
This will be your working station.
2. Place the first sheet of pastry onto the tray.
Brushing it with melted butter. The filo pastry I have is about
23cmx46cm, I cut it in half and work on the square shape.
3. Repeat the brushing process for each layer of
pastry. Filo pastry is as fine as rice paper. Try to patch it if it
breaks rather than throwing the whole sheet away. You don't notice it in
the end product.
4. Combine walnuts, cinnamon and sugar, sprinkle
evenly over top layer.
5. Fold the two ends of the pastry toward the middle.
Then fold it again so you have one end stacking on top of the other like
a roll. Brush the top and side of the roll with butter.
6. Bake in the pre-heat oven at 170C for about 30
minutes or until crisp and golden brown.
7. For the syrup: Combine sugar and water in a small
saucepan pan, stir over low heat until sugar has dissolved. Add in lemon
juice and honey and boil until the syrup starts to thicken.
8. Trim the end of the roll, then cut the roll into
2cm thick pieces. Drizzle hot syrup over the Baklava.
Berry Sponge Cupcakes
(make 12)
Cupcakes
3 eggs
½ cup caster sugar
1/2 cup Lighthouse Cake,
Sponge & Steamed Bun Self Raising flour, shifted
200g cornflour, sifted
20g butter, softened
1/4 cup boiling water
Buttercream Icing:
20g butter, softened
2 tablespoons berry jam
1 cup icing sugar, sifted
Method:
1.
Preheat
oven to 180c. Fill a baking tray with mini cupcake cases.
2.
Beat
egg until thick and creamy, add sugar and fold in flour, butter and water.
3.
Pour
into cases and bake for 15-18 minutes.
4.
Meanwhile,
beat butter, jam and icing sugar until light and fluffy.
5.
Decorate
cooled cake with icing and place a fresh blueberry in the middle of each
cupcake.
2nd
Layer
Chicken and Salad Warp
1
piece of warp
cooked
chicken
salad
of your choice
Aioli
sauce
Place
chicken, salad and drizzle sauce over the wrap. Roll up and cut into 4-5 pieces
and each piece with a toothpick.
Honey Roasted Almond & Fig
Tart
(make
4 x 11cm tartlets)
250g
shortcrust pastry (you can make your own or use the frozen one)
4
figs, stalks trimmed
zest
of 1/2 orange and juice
1/2
tablespoon honey
100g
butter, softened
100g
sugar
100g
almond meal
1
egg yolks
Method:
1.
Preheat oven 180c.
2.
Roll out the pastry over the tart cases, place a
piece of baking paper over and ceramic beans over each and blind bake for 15
minutes then remove the beans and bake for another 5 minutes.
3.
Cut figs halve lengthways and mix with honey and
orange juice. Roast 10-12 minutes at 180c till soft, Drain and reserve the
juice.
4.
Cream butter and sugar till smooth and pale. Add in
almond and zest, then yolk and I ½ tablespoon of fig juice.
5.
Pour the filling into the tart cases, Press the figs
cut side up into the centre and bake for about 45 minutes at 150c. The centre
will be a little gooey. Leave for 15 minutes before removing tin.
6.
Boil remaining juice and simmer till sticky and pour
over the tart.
3rd
Layer
Assorted Sandwiches
Egg and Bacon, Egg and
Mayo, Cucumber and Mayo
Egg and Tomato Tarts
(make 4)
Ingredients:
4 eggs
2 bacon rashers, cut the
shortcut bit into small pieces and use the rinds to roll up pineapple pieces OR
2 shortcut bacon, cut into
small pieces
filo pastry, about
15cmx15cm
baby spinach leaves
4 cherry tomatos, halves
1 tablespoon red onion,
finely chopped
oil
Method:
1. Preheat the oven to 180c. Grease the muffin
cups with oil.
2. Lightly pan-fried the bacon, leave aside.
3. Place 3 sheets of pastry into the muffin tin, brush
with oil. Repeat the process two more times until the tin is well covered.
4. Line the pastry cases with few spinach
leaves, place the tomato cut side up, add some bacon pieces and chopped onions.
Carefully break an egg into the case. If you are using a muffin
tray, fill the unused hole with water.
5. Bake for 20 minutes or until the egg white has set.
Use a knife to lift up the tart and stand for 5 minutes before serving.


 But Most Days, I just want something simple to nourish myself. An overnight oats or a dairy free smoothies for breakfast, an avocado with vegemite on toast or a hearty vegetable soup for lunch, a chicken stir-fry for dinner and not need to mention the awesome fruit.


