Showing posts with label product review. Show all posts

Saturday, March 21, 2015

Humming Bird Slices and Coconut & Almond Slices


I could not decide which slices I like the best between these two slices. I love the fruity flavour of the Humming Bird Slices but I also love the buttery, almond topping of the coconut slices. I always has the problem to choose, I could end up buying two paris of the same design shoes in different colours. So I decide to put a twin post again and let you to choose! They are both great recipes to bake on Sunday!

Humming Bird Slices

Ingredients:

100g butter, melted
1/2 cup brown sugar
1 cup self raising flour
1/3 cup desiccated coconut
2 eggs
1 cup fresh pineapple
1 banana, meshed
1/2 teaspoon ground cinnamon
1/2 cup roasted pecan, chopped, leave some for sprinkling

Icing:
Philly lemon cream cheese frosting

Method:

  1. Put all the dry ingredients into a mixing bowl, mix well.  Then stir in butter, fruit and nuts. 
  2. Stir till well combined and spread over a paper lined slice pan. Bake for 30-35 minutes at 180c.
  3. When the slice is cooled, spread the frosting evenly over and sprinkle some pecan nuts over the top.
  4. Keep in the fridge.


Coconut and Almond Slices

Ingredients:

For the base:
125g butter
1/4 cup caster sugar
1 cup plain flour
1/4 cup desiccated coconut
1 teaspoon vanilla essence

For the filling:
90g butter
1/3 cup castor sugar
2 eggs
1 cup desiccated coconut
1 cup almond meal
1/2 teaspoon orange rind
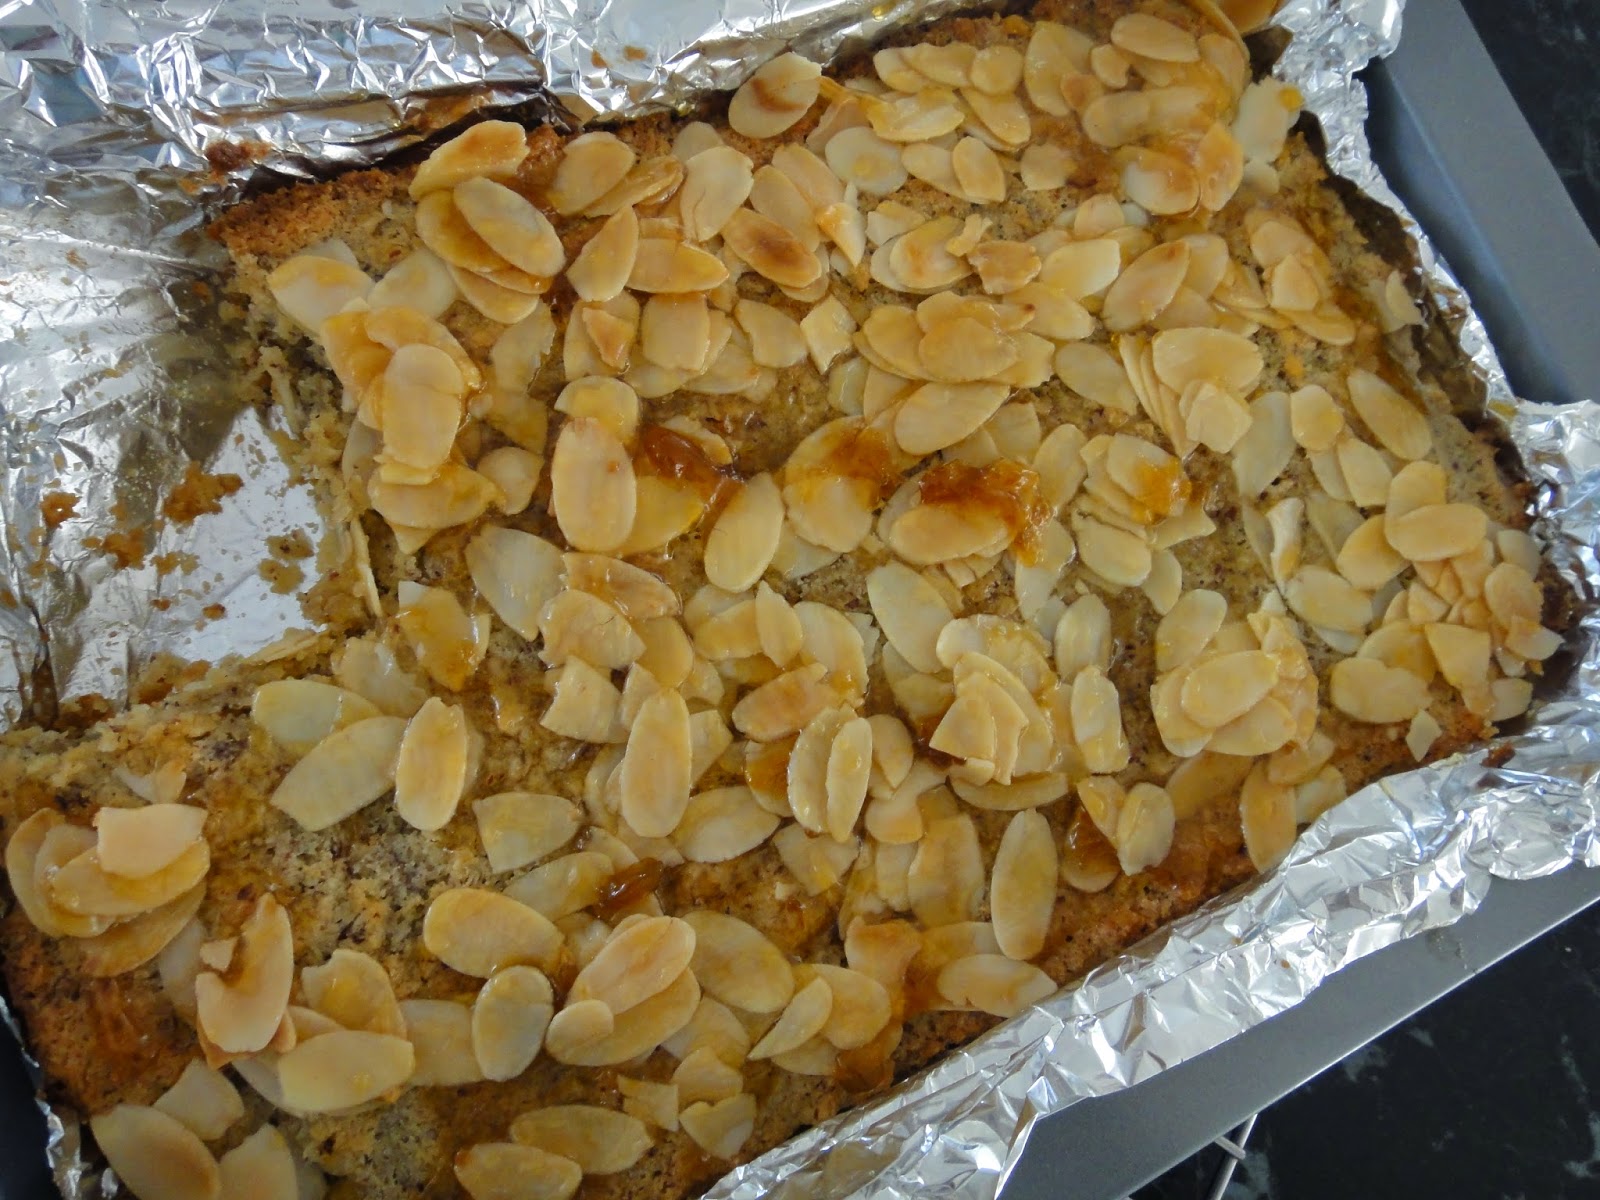
For the topping:
flaked almonds
warm apricot jam, for brushing

Method:

  1. Beat butter and sugar till creamy and add the flour, coconut and essence for the base.  Spread the base over a paper lined baking pan. Bake for 15 minutes at 180c.
  2. Meanwhile, prepare the filling. Beat butter and sugar till creamy.  Add in eggs one at a time.  Stir in the coconut, almond meal and orange rind till combined.
  3. Spread the filling over the hot base and sprinkle almond flakes over.  Bake for a further 15-18 minutes until the almond flakes turns golden. Brush the slice with hot apricot jam.
  4. Leave cool in pan before cutting into squares. Enjoy!

Monday, July 14, 2014

Overnight Oats with Strawberry (dairy free)


What would be the perfect breakfast for you? My husband and son would put their hands up and say "Bacon and Egg!" and my daughter would be happy to have French toast with a tub of yoghurt. And for me, this overnight oats with strawberry is my perfect breakfast that keep me going for at least a few hours till lunch time. It provides a good start of the day with fibre, protein, anti-oxidents and calcium....and the best thing is that it is ready to serve in a jar with only a little of work to do the night before.


Overnight oats with strawberry

Ingredients:
1 cup sweetened almond milk
6 tablespoons rolled oats
1 tablespoon chia seeds
few goji berries
4-5 fresh strawberries, halves

Method:
Pour milk into a medium size glass jar, add the rolled oats, chia seeds and goji berries. Give it a stir, then add in strawberries. Tighten the jar with a lid. Place into the fridge overnight. Add some toasted muesli and more fresh fruit if needed when serve.

Tip: I usually leave it at room temperature for 20 minutes before serving. If you want to warm it up, leave the strawberries and add it in the morning instead. You can also sprinkle more nuts and goji berries before serving to suit your taste.

Saturday, June 29, 2013

An Unexpected Health Issue and 3 Years of Blogging - Devil's Food Cake II


My dear friend, I'm afraid I have to leave you for a while as I am going to have an unexpected surgery tomorrow that require a period of resting.  It had been 3 years since I had my last surgery.  I am afraid to go to the hospital again but it is important for me to maintain good health to live in this beautiful world.  Let's hope everything goes well!

I am excited that I'm reaching my 3rd year of blogging at the end of July! I have never stay in a hobby for that long and you can see how much I love spending my time in the kitchen. I am pleased that I've learned from you, not only about food, it's all about sharing love and experiences.

I made the strawberry devils food cake for my son's birthday last year.  Then I find this recipe at the back of the flour packet with the name as "indulgent chocolate fudge cake" which is very similar to the recipe of devil's food cake using bicarbonate soda and milk.  It's the best ever rich chocolate cake so far judged by my husband, he actually ate two big slices in one go, very naughty! I guess we should act like a devil sometimes!

For the left-over cake, simply heat up in the microwave, the ganache melted to be a fudge topping, serve with some ice-cream will be a great winter dessert. I'll recommend using Lighthouse's self-raising flour and Cadbury's cocoa for the recipe, they work well together and the cake is moist and soft!

See you soon, good health to you all!

Devil's Food Cake II

Ingredients:
1 cup Lighthouse cake & biscuit self raising flour
1 cup caster sugar
1/2 cup Cadbury Bournville cocoa
1/2 teaspoon bicarbonate soda
120g dark chocolate
200 butter, diced
3 eggs, beaten
3/4 cup milk

Chocolate Ganache:
150g milk chocolate
25g dark chocolate
1/3 cup plus 1 tablespoon thicken cream

Methods:

  1. Preheat oven to 170c (150c fan-forced), line a 20cm round cake tin with baking paper.
  2. Sift the flour, sugar, cocoa and bicarbonate soda into a mixing bowl until mixed through. 
  3. Melted butter and chocolate in a double boiler over simmering water.  Let cool slightly.
  4. Add the eggs, milk and chocolate mixture into the dry ingredients. Stir till well combined.  Pour the cake batter into the cake tin and bake for 40 minutes or until the skewer comes out clean after inserting into the cake.  Let the cake cool for a few minutes in the tin before transferring to a wire rack.
  5. To make the ganache: add chocolate and cream in a double boiler over simmering water until smooth.  Cool the chocolate mixture into the fridge until it becomes thick and spreadable.
  6. Decorate the chocolate cake with the ganache.


Friday, May 31, 2013

Oat Milk Chai Latte


We have winter comes in late this year and it seems that we get cold all of a sudden. This winter we have lots of clouds making it quite cold during day time. I have two sicks kids within a week.  We have been missing the sun from the sunny Queensland. All I want to have the whole day is hot drinks.  I have been on hot chocolate for a while and now I am into oat milk again.  Just because I have to watch out for my cholesterol, I make up this Chai Latte using oat milk.  It keeps me warm and make me healthy, yes it has only 1% of fat!

Oat Milk Chai Latte
(make 1 tall glass)

1 cup Vitasoy Oat milk
1 ceylon tea bag
2 teaspoons of sugar
ground cinnamon
extra froth oat milk or cow's milk

Method:
Pour the oat milk into a small saucepan, place a tea bag on the side and let it simmers for about 1 minute till the milk is hot and the tea infused into the milk.  Add the sugar and sprinkle with cinnamon powder.  Leave the heat and make froth milk.  Pour the milk into a tall glass and top with froth milk.  Enjoy!


Thursday, May 9, 2013

Pumpkin and Ricotta Puffs with Avocado Green Salad


Mother's Day is one of the big promotion for retail stores and restaurants, you see the ads for gift ideas everywhere or ads for Mother's Day special at the local restaurants. We like to give kitchen appliances for my mother because she can use it to cook delicious food for us!  My husband bought me this Phillip's Air Flyer last year, although not a Mother's Day present but I just loved it!  It cooks wonderful crispy potatoes chips and chicken wings without using any oil.  It doesn't only fry food with less oil, you can also baked creamy potato gratin or pasta using its brownie pan.   It is a good kitchen helper that now sit permanently at my kitchen bench. The cooking time is shorter than a built in oven as it takes less time to heat up and the food get both sides cooked nicely.  The downside is that it only has a small cooking tray and the maximum temperature goes up to 200c.  However it's a great helper if you need an extra oven to cook up something small within a short time.

I roast the pumpkin using the Air Flyer and it takes only 12 minutes to get done.  Then I bake the puffs in the big oven.  The avocado salad goes well with the puffs, these day I just prefer something light liked this.  I'm expecting my kids to make me breakfast in bed, some raisin toast with a glass of oat milk would be nice!

Have a Happy Mother's Day!


Pumpkin and Ricotta Puffs with Avocado Green Salad
(make 8)

350g pumpkin
1 tablespoon oil
1/2 teaspoon salt
40g cashew, toasted and grounded
1 tablespoon parmesan cheese
2 tablespoon light ricotta cheese
extra 1/4 teaspoon salt
pinch of chilli powder
2 sheets of puff pastry
egg wash for glazing

Avocado Green Salad:
Leafy Mixed
1/4 of a whole avocado
lemon infused olive oil
white rice vinegar


Methods:

  1. Cut off the skin and seed of the pumpkin and cut into cubes.  Season with salt and oil, toss through.  Then place into the cooking tray of the Air Flyer and cook for 12 minutes at 180c.
  2. Mesh the cooked pumpkin with the back of the fork, add in the cashew, parmesan cheese, ricotta cheese and season with the extra salt and chilli powder.
  3. Cut the puff pastry into quarter, brush the sides with egg.  Place a heap tablespoon of pumpkin mesh on a corner, seal.  Repeat for the rest of the pastry.
  4. Line a baking tray with baking paper. Bake in hot oven, 230c until it puffs up and starting to turn golden brown, turn down to 180c until the puffs turn all golden brown. 
  5. Rinse the leafy mix under the sink and drain, cut the avocado into cube, dress with the olive oil and vinegar.


Friday, March 22, 2013

Easter Bunny Popsticks


There is only a week away from Easter, this year I'm making chocolate bunny to give to people instead of store brought Easter eggs.  I found this "Make your own Easter Gifts" pack from IGA supermarket at $10.  It includes all the things you needed to make 12 chocolate bunnies.  I buy more chocolate melts and have been making many bunnies (I do lost count how many I've made as I eat some along the way...)


I have been experiment different flavour, and I like the Hundred & Thousand Bunny and Milk top bunny the most.  The pure white choc bunny takes longer time to set and it doesn't keep well at room temperature.  It would be great to have more mould so it would take me faster to do the job.  I found that reheating the melted chocolate is not good, so I put the extra chocolate into other chocolate mould to make something else rather than washing if off.  In my first lot of chocolate, I forget to press medium on the microwave and burn my chocolate so please be careful and never overheat the chocolate!

Aren't those bunnies adorable?  They're so easy to make and you should try it!

Happy Easter!

Easter Bunny Popsticks
(make 4 each)

For the milk chocolate bunny:
120g milk chocolate
Hundred & Thousand sprinkles

For the milk top bunny:
30g white chocolate
90g milk chocolate

Method:

  1. Wipe the mould clean with paper. 
  2. Melt chocolate in a microwave safe bowl on medium heat for 1 minute, then 30 second on medium heat until the chocolate is all melted. 
  3. Use a spoon to spoon chocolate into each mould until half full.  Place a popstick into each mould, then tap onto the table to ease the air.  Fill with more chocolate and tap again.  Don't over fill and top with hundred & thousand sprinkles.  Wipe clean and put into fridge for 15 minutes or until set.  
  4. For the milk top bunny: melt white chocolate on medium heat until melted.  Spoon chocolate into mould, tap off air and then put into fridge to set.  Meanwhile, melt the milk chocolate on medium heat and lay a popstick into each mould.  Spoon the milk chocolate over the milk chocolate and keep in the fridge for about an hour or until set.


Monday, December 5, 2011

Easy Chicken and Potato Casserole


It has been a year since my mother-in-law visit me last December.  I am still trying to finish the food she left behind. (I'm not joking!) It's really the love for her to show that she cares about us but it could be quite a challenge for me to use her ingredients as we have different cooking skills.  I have a few packets of this Continental Spaghetti bolognese powder mix that she left behind and I have made several pasta dish from that already.  In fact, I hardly buy any powdered food like this as I reckon they are space food for the astronaut.  While I'm living on earth, I would prefer to make my own sauce or use the bottle/tin instead.  So I end up putting it into a casserole, my very own "space casserole."

I have tried many western style casserole but the only one that my husband will eat is the apricot-chicken that also use powdered food (French onion soup).  He just doesn't like the taste of canned tomato in casserole, so I put in his favourite tomato sauce (ketch-up) for this casserole recipe.  Even though it is not quite that typical kinds of a casserole, I finally got him to love casserole after all this trial and error.  Waiting for him to tell me what he thinks feel likes waiting for my report card.


Chicken and Potato Casserole
(serve 3 - 6)
6 chicken drumsticks
1 medium carrot, chopped
1 small onion, chopped
2 medium potato, chopped (about 2cm)
1/2 packet (25g) of the Continental Spaghetti Bolognese
1 teaspoon of garlic mince 
1/2 cup tomato sauce
1 1/3-1 1/2 cup water
3 tablespoons plain flour
1/2 teaspoon salt
pepper
a handful of frozen pea
a handful of shredded cheese

Method:
  1. Preheat the oven at 200c.
  2. Marinate chicken with salt and pepper and set aside for 20 minutes.  Then coat chicken with plain flour.  
  3. Heat oil in pan, pan fry chicken until the skin is evenly brown.  Set aside.
  4. Heat oil in casserole, stir in onion and then garlic.  Add in chicken, carrot and potato and stir for a few minutes with medium heat.  Then add the spaghetti bolognese powder mix, tomato sauce and water.  Keep stirring until it is well combined. 
  5. Finally add the peas and cheese.  Close the lid and bake in the oven for 50 minutes to 1 hour.  Take the lid off after 35 minutes and bake uncovered for the last 15-25 minutes.  If it gets too brown but the potato is still not cooked, cover it with the lid again and bake until it is cooked.
Note: Do not cut the potato too big as it will take longer time to cook.


It's always excited to put up the Christmas tree than put it away.  Some of our neighbours have their houses decorated with outdoor light and Christmas decoration.  We like to drive along and looking at them every year to pick our favourite one.  Besides the celebration of the born of Jesus, Christmas is also the time for giving, to show our love and care to our family and friends as well as to the needed.  I made this tea cosy for my daughter's friend as she wants to show the appreciation of her friendship.  We are having secret Santa this year for the kids, each kid will buy a present for a cousin (that is picked by random) and also receive a present from another cousin.  I hope this can be a tradition in my family and leave good memory for the kids.   


Saturday, April 2, 2011

Chicken Wraps with Avocado and Salsa


There are many types of bread in the market that can be used for wraps.  Although I am not a shopper that is sensitive to things like perservatives, colouring or MSG, I would like to choose a product which is both natural, healthy and tasty.  If you read the labels of the wraps, many of them contains perservatives and soy.  I would not choose that product for my kids, at least not all the time.  I don't quite understand why the manufacturer uses soy flour to make bread, isn't bread made from wheat flour?  Maybe it helps to improve the texture of the bread.  It would be different if the bread is specified for people with a sensitive diet such as gluten free.  For ordinary people like me, I would have consumed a lot of soy from hidden product such as bread and cracker plus the normal amount I am taking from soy milk, tofu and soy sauce.  I am not sure if taking too much soy would be bad for you but I would like to choose bread that are made without soy.  Vitastic's Sorj Wraps is the brand I recommend as it does not have perservatives and soy.  It is thin and it does not crack when you roll it up.  However, it does mould quickly, keep in the fridge and toast the left over bread for dip.

Chicken Wraps with Avocado and Salsa
(serve 2)

Ingredients:
2 sheets of Vitastic White Sorj Wraps
3/4 cup chicken pieces
baby cobbs lettuce
1/2 avocado
Salsa sauce (store brought)
shredded cheddar cheese

Method:

  1. Heat oil in pan and cook chicken until cook.
  2. Lay the wrap onto the chopping board.  Place the lettuce onto the wrap, followed by avocado, chicken, cheese and salsa sauce.  Roll the wrap and cut it into half and serve it with green salad.