Showing posts with label cake. Show all posts

Saturday, July 25, 2015

Orange Poppy Seeds Syrup Cake

Orange Poppy Seeds Cake


My daughter made us this cake 5 years ago when I had my first chemo and I didn't want to bake anymore cake or cookies. I was very afraid of food for a while, wondering what caused me to have cancer. It could be food, stress, life style or genetic reason. All the organic food I had been having seemed not helping me. Then I had my 2nd cancer, it could be something brought up with the 1st cancer or I was just having more bad luck. I became very afraid of eating of meat protein.

So after 5 years, I really don't want to find out why or be afraid of having cancer.  Happiness is the main thing for me to live to the fullness and a good balance diet and exercise is the best way to avoid further sickness. Life could be very short and the love one could be gone in anytime, the main thing is to treasure every single day, every little thing that makes you smile and feeling grateful.

Don't be afraid of any food that you enjoy to eat as long as you are having a balanced diet!

Ingredients:

125g butter
3/4 cup castor sugar
zest of 1 orange
2 eggs
1 1/2 cups self raising flour
1/2 cup milk
1/4 cup poppy seeds

For the syrup:
1/2 cup orange juice
1/2 cup castor sugar

Method:


  1. Soak poppy seeds with milk for 1/2 hour.
  2. Cream butter, sugar and zest until light and fluffy. Add in eggs, mix well. Fold in flour, milk and poppy seeds mixture and stir till well mixed.
  3. Spoon batter into a 22cm paper line cake tin.  Bake in a preheated oven at 180c for about 40 minutes or when a skewer inserted in the centre comes out clean.
  4. Heat orange juice and sugar in a small saucepan until sugar dissolved. Let it boil for a little until syrupy. Pour hot syrup over hot cake. The cake will absorb the syrup an hour or two.  


Monday, July 6, 2015

Berries and Coconut Muffins and Apple and Muesli Muffins


I have a collection of muffin recipes and this is my favourite one so far. Adopted from the cookbook " coming home" by Cathy Armstrong, these muffins are moist and delicious. Image holding them in your hands on a cold winter day, it's just so satisfying. Enjoy!

Berries and Coconut Muffins and Green Apple and Muesli Muffins
(make 12)

Ingredients:

2 1/2 cup self raising flour
3/4 cup castor sugar
3/4 cup desiccated coconut
100g butter, melted
1 1/2 cups milk
3/4 cup plain yoghurt
1 teaspoon vanilla essence

For the berries muffins:
1/2 punnet of strawberry
1/2 punnet of blueberry
icing sugar for dusting

For the apple and muesli muffins:
1 to 2 green apples, peel, cored and cut into pieces
1/4 teaspoon ground cinnamon
toasted muesli for sprinkle

Method:

  1. Mix the dry ingredients together. Then add in butter, milk, yoghurt and vanilla. Stir a little and add the berries till just come together.  
  2. Divide the batter into two lots. One with berries and one with apple and cinnamon. Spoon batter into muffin cases. Sprinkle muesli over the apple muffins and bake for 30-35 minutes at 190c.
  3. When the muffins are cooled, dust with icing sugar for the berries one.
Source: Adopted and modified from the cookbook "Coming Home" by Cathy Armstrong


Tuesday, February 10, 2015

Nutella Strawberry Shortcake


This is another great idea to celebrate Valentine's Day. As my family doesn't like cake decorated with whipped cream a lot. I choose to ice the cake with nutella and serve it with ice-cream. It could be one of the last minute dessert that looks like a lot of work has been done!

Nutella Strawberry Shortcake

Ingredients:
60g butter
2 tablespoons caster sugar
2 egg yolks
3/4 cup Lighthouse low-protein self-raising flour
1/3 cup milk
1 punnet strawberry
nutella
icing sugar for dusting

Method:

  1. Cream butter and sugar until light and fluffy, add egg yolks and beat well.  Add in sifted raising flour and milk until well mixed.
  2. Press dough into a lightly greased 20cm sandwich tin, bake in 180c for 15-20 minutes.
  3. Remove cake from tin and cool slightly. Spread with nutella and decorate with strawberries. Serve with cream or ice-cream.

Thursday, October 2, 2014

Magic Cake


My dear friend, after finishing my lists of health check, it's great to get good news from my doctors. As I am under health surveillance, I am good for another couples of months till the next test. So, let do some celebration!

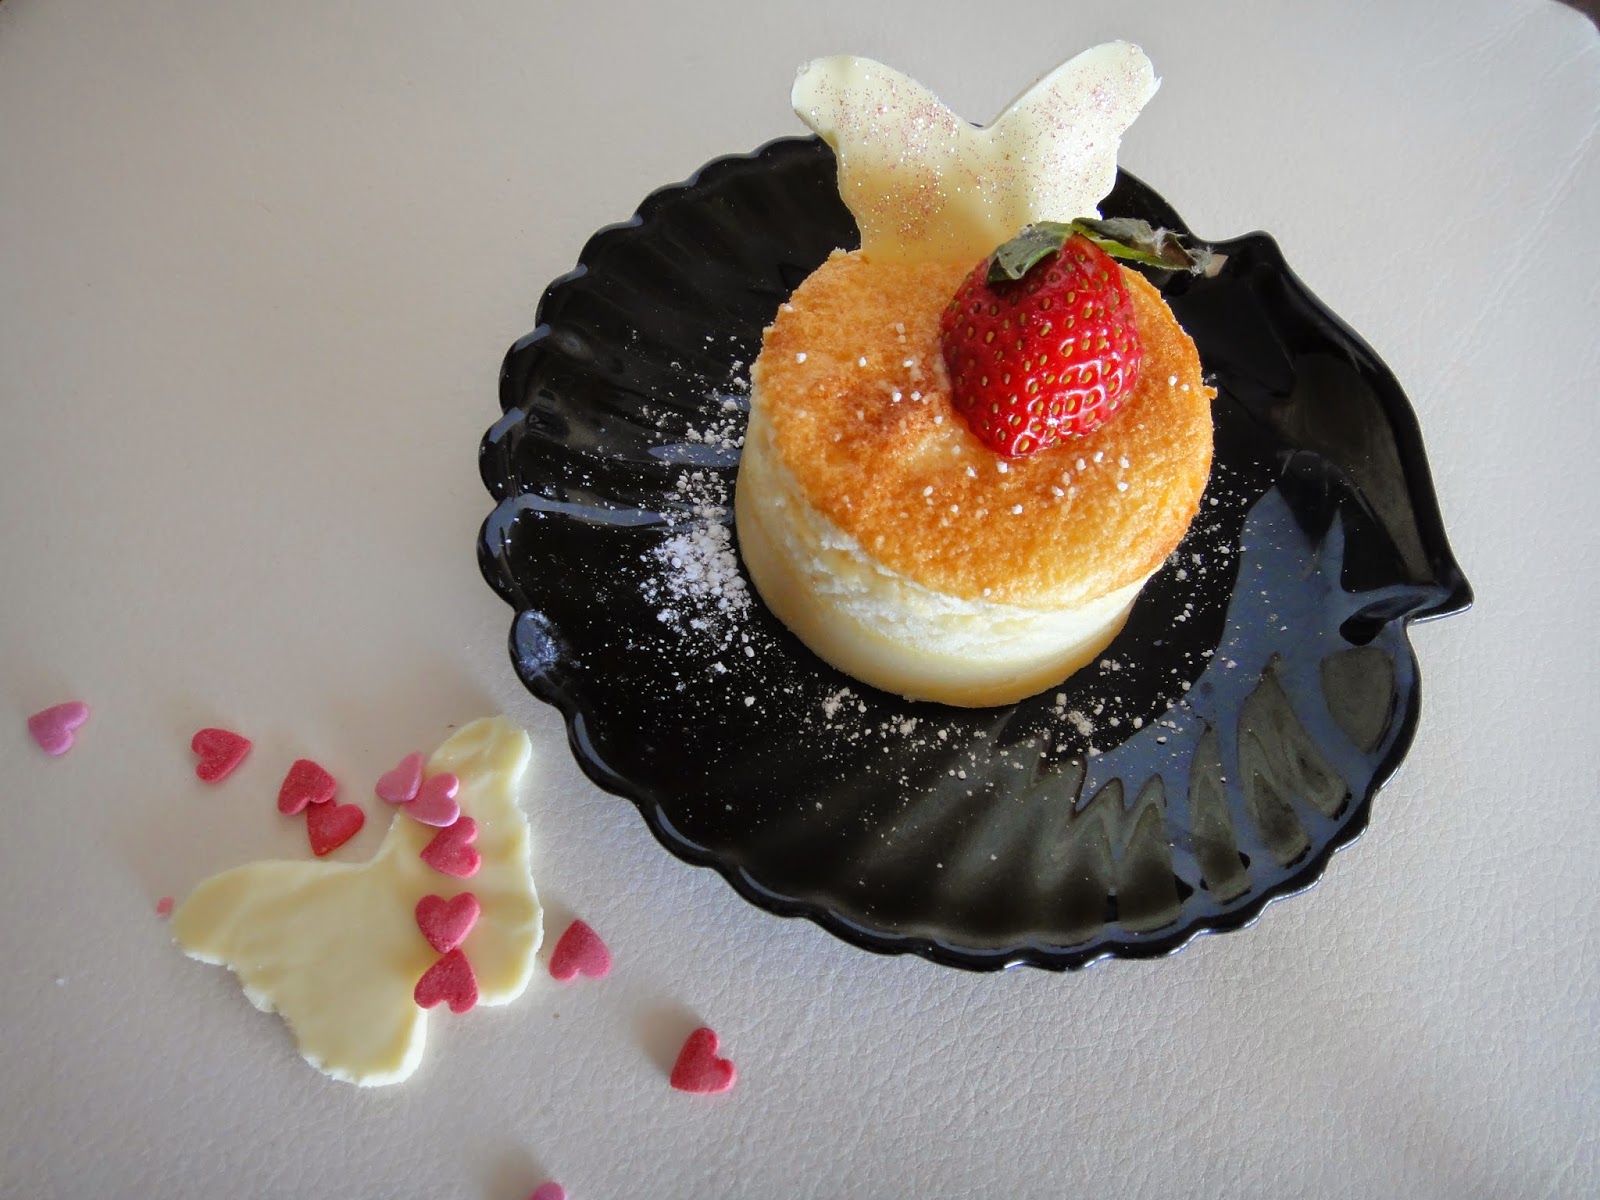
I find this recipe from Zoe of Bake for happy kids. Originally this cake is introduced by my cousin-in-law who also introduce me to the Flourless chocolate cake with red kidney beans.  I have been following Zoe for a long time and have found several good recipes from her. This cake is called magic cake as you don't need to do much and the cake would produce three layers: a base layer that tastes like Chinese steam cake, a middle with custard filling and the top with a soft velvety sponge. This cake is best to serve within 1 or 2 days as the top sponge would lose its freshness and the bottom base becomes hard by keeping in the fridge. I would recommend to serve on the day at room temperature.


Please check out Zoe's recipe here. The only alternation I did in the recipe was to bake in a rectangle lamington pan. Then I uses a scone cutter to cut the cake out from the pan. Dust it with some icing sugar and decorate with white chocolate butterflies that dusted with fairy dusts and strawberries. 

Enjoy the magic!


Saturday, August 23, 2014

White Chocolate & Raspberry Blondies


After my guest post of white chocolate & raspberries muffins, it reminds me that this blondies recipe has been bookmarked for a long time and it's about time to review it.

Blondies is the white version of brownies, my favourite is the nutella chocolate brownies. Unlike a lot of people, I prefer my brownies using less oil and well cooked rather than the fudgy one.

This blondies is rich in butter taste and I like the raspberries puree which is much better than just putting in whole raspberries into the mixture so the blondies don't get too soggy.

What's your favourite brownies or blondies?


White Chocolate & Raspberry Blondies

60g raspberries
1/2 cup caster sugar
150g butter, chopped
250g white chocolate, chopped
3 eggs, beaten
1 2/3 cup plain flour ( I use 1 cup plain flour and 2/3 cup self raising)
1 teaspoon baking powder

Method:

  1. Pre heat oven at 180c. Combine raspberries with 2 tablespoons of sugar and 1 tablespoon water in a saucepan over low heat. Leave cool a little and blend till puree formed.
  2. Place butter and 200g chocolate and melt in a double boiler. Leave cool.
  3. Whisk eggs and remaining sugar into a mixing bowl. Sift in flour and baking powder.  Stir in chocolate mixture and 50g white chocolate. Spoon into a lamington pan (I put into a square pan)
  4. Drizzle over the puree and make a swirl with a skewer or knife.
  5. I bake it for 35 minutes.  The recipe stated for 20 minutes and cool in fridge, please check the source from down below if required.
  6. Cool in pan before cutting into pieces.
Source: adopted and modified from Delicious magazine through taste.com http://www.taste.com.au/recipes/28629/raspberry+white+chocolate+blondies

Wednesday, July 30, 2014

Guest post to celebrate 4 years of blogging and reaching 200 posts - the Best Raspberry & White Chocolate Muffins


My dear friends, I am so happy that this blog has reached its milestones of 4 years with 200 posts.  This blog helps me to recover from my illness and I feel so grateful to be able to enjoy everyday of my life with great food, great love and great laugh!

These raspberry & white choc muffins were baked by my friend, Andi during the school holiday while our boys were making lots of noise playing their ukuleles at her place. Andi has such a crafty talent and her cooking is packed with flavour. She introduces me to the roasted capsicum and pumpkin soup that is truly a great winter warmer. There are so many raspberry & white choc muffins recipes and this recipe is by far the best, the muffins are so moist and dense with flavour. So if she is making more next time, I'll bring a container to take some home before they disappeared!

Here is Andi's thought sharing her muffins and I hope you enjoy reading this blog and have a wonderful day!

A friend of mine has popular coffee shop and bakes fresh batches of muffins each morning upon opening.  The smell as they're baking is amazing, customers flock for these yummy muffins!  Her basic muffin recipe is fool-proof and you add a handful of fruit and a handful of chocolate.  Our family favourite is the Raspberry and White Chocolate muffins and they soon disappear after coming out of the oven!  You can also do a blueberry and dark chocolate muffin which is pretty good too.  If you're quick you maybe able to stash some in the freezer for school or work- they make a wonderful treat.  My son especially enjoys them!  The balance of the sweet chocolate against the tart raspberries is just divine.  Just a hint not to break up the chocolate too small, it'll melt and disappear.  Lindt chocolate or a quality chocolate is also recommended.  It holds it's shape better and who can argue with the taste!  Please enjoy and I'm sure these will become a family favourite.


Raspberry & White Chocolate Muffins
(makes 6 extra large and 12 smaller muffins)

Ingredients:
300g self raising flour
125g castor sugar
300ml buttermilk
200ml oil
2 beaten eggs
1 block of white chocolate, broken up
handful of fresh/frozen raspberries

White chocolate butter icing:
100g softened unsalted butter
100g white chocolate
dash milk
100-150g icing sugar

Method:

  1. Combine dry ingredients in bowl and make a well.
  2. Add all other wet ingredients and stir until combined.
  3. Add chocolate and raspberries (be gentle)
  4. Put into lined muffin tray.
  5. Bake 18-20 minutes at 180c oven until springback or skewer comes out clean.
  6. For the icing: melt white chocolate with dash of milk until just melted. Beat butter until light and fluffy. Add icing sugar and melted chocolate. Spread or pipe onto cooled muffins.


Sunday, May 11, 2014

Date & Walnuts Loaf


This is an old fashion bread that I've adopted from an ninety years old reader from a woman magazine.  It is a teacake/coffee cake that meant to be eaten freshly made with the accompany of tea or coffee. Because it doesn't use a lot of butter in the recipe, the texture of the bread is a bit dry.  It is usually served with a generous amount of butter to moisten and enhance the flavour of the bread.  Imagine spreading butter to the warm bread and the butter melted and soaked into the bread, Yum! It's also a great idea for kid's lunch box with the goodness of fruit and nuts.

In Australia, banana bread, muffins and brownie are the most popular homebake.  Maybe we have just forgotten about this old fashion bread and I reckon we should bake this bread more often to keep this recipe to last from generation to generation.

Have a Happy Mother's Day!


Date & Walnuts Loaf

1 cup dates, pitted and chopped
1 cup water
1 teaspoon bicarbonate of soda
3 tablespoon butter
1/3 cup brown sugar
2 eggs
2 cups self raising flour
1/2 cup walnuts, chopped

Method:

  1. Pre heat oven at 180c.
  2. Pour water into a small saucepan, add dates and butter and let it boil. Take away from heat and add the bicarbonate of soda.  Let it cool a bit.
  3. Mix the flour and sugar into a mixing bowl, add beaten eggs and then add the dates mixtures. Stir well and finally add the walnuts. Top the bread with 3 extra whole walnuts.
  4. Pour the dough into a paper lined loaf tin, bake for 40 minutes.

Wednesday, April 30, 2014

Flourless Chocolate Cake with Red Kidney Beans


The first question my kids asked after seeing this cake is, "Mum, what's that? It's so dark!" I just told them that it was a chocolate cake. I'd probably told them half of the truth and it's only my "not so liked bean's son" had the dare to try it even he knew it wasn't an ordinary chocolate cake. After taking one piece of it, he went straight for something else in the pantry and never touch the cake again!

However, my husband thinks this is a really nice cake, so moist and soft.  He urges me to share it so there you are, a flourless chocolate cake with red kidney beans.  Before I bake it, I don't know what to expect as I rarely bake cake without flour but I am pleased with the texture of the cake, and the taste of beans mixed with the cocoa powder, it's a bit liked those Japanese cake made with aduki beans. Maybe next time, I will ice it with some maccha (green tea) flavoured cream and that may make the cake more presentable!


Flourless Chocolate Cake with Red Kidney Beans

Ingredients:

1 can (410g) of Red Kidney Beans
1 tablespoon water
1 teaspoon vanilla essence
100g butter, soften
150g caster sugar
60g cocoa powder
2 teaspoons instant coffee powder
1 teaspoon baking powder
1/2 teaspoon soda bicarbonate
4 eggs

Method:

  1. Preheat oven at 170c. Line a round cake tin with baking paper.
  2. Drain and rinse the beans. Process the beans with water, vanilla and 1 egg in a blender until smooth. Set aside.
  3. Beat butter and sugar until fluffy, add eggs and bean mixture. Stir well. then finally add the sifted dry ingredients.
  4. Bake for 40-50 minutes or until the skewer come out clean after inserting into the cake.


Wednesday, March 5, 2014

Chocolate Chia Seeds Cupcake (Gluten Free)


Chia seeds has been regarded as a superfood with its nutrients value.  It was introduced by one of my friend and she asked me to put it into drinking water and consume it daily for well being.  I have been trying to find out more use with this little seeds by adding it to smoothies, salad and cereal. Last week I celebrated with my girl friends for finishing my chemo and I ordered a chocolate chia seeds cake which was quite delicious! When I got home, I got onto the computer to search for a recipe straight away.  These days I don't bake very often for trying to cut down sweet food and have more veggie and fruit for good health. But sweet food makes you happy and it is OK to have a once in a while!

These cupcakes taste quite different with the cinnamon added to the chocolate.  If you have had many chocolate cake and prefer something special, you may like this recipe. The cake is moist and strong in chocolate taste and not too sweet.  This is my first baking for gluten free cake and I'm very please with the result!


Chocolate Chai Seeds Cupcake
(make 10)

Ingredients:
5 eggs
1/2 cup olive oil
1 cup almond meal
1/2 cup cocoa powder
1/2 cup raw sugar (3/4 cup if you want it sweeter)
2 heaps tablespoons honey
1 teaspoon bicarbonate soda
1 teaspoon cinnamon
4 tablespoons chia seeds
pinch of salt

Chocolate frosting:
1/2 cup dark choc chips
2 tablespoons milk
1 tablespoon coconut oil
few drops of vanilla essence
2 heaps tablespoons icing sugar

Methods:

  1. Soak chia seeds with 1 cup of water for 15 minutes then drain.
  2. Beaten eggs with oil, sugar and honey in a mixing bowl until well mixed.  Sift in almond meal, cocoa powder, bicarbonate soda, cinnamon and salt. Stir well, then add the soaked chia seeds. Mix sell.
  3. Divide the mixture into a muffin pan, lined with muffin case. Fill the unused muffin holes with water to ensure even heating for baking. Bake for 20 minutes at 180c.
  4. For the frosting: microwave the choc chips, milk and coconut oil in medium heat at 20 seconds, then 30 seconds until the chocolate melted. Add in vanilla essence and sifted icing sugar. Mix well, then place into the fridge to harden the frosting until it is spreadable.


Saturday, June 29, 2013

An Unexpected Health Issue and 3 Years of Blogging - Devil's Food Cake II


My dear friend, I'm afraid I have to leave you for a while as I am going to have an unexpected surgery tomorrow that require a period of resting.  It had been 3 years since I had my last surgery.  I am afraid to go to the hospital again but it is important for me to maintain good health to live in this beautiful world.  Let's hope everything goes well!

I am excited that I'm reaching my 3rd year of blogging at the end of July! I have never stay in a hobby for that long and you can see how much I love spending my time in the kitchen. I am pleased that I've learned from you, not only about food, it's all about sharing love and experiences.

I made the strawberry devils food cake for my son's birthday last year.  Then I find this recipe at the back of the flour packet with the name as "indulgent chocolate fudge cake" which is very similar to the recipe of devil's food cake using bicarbonate soda and milk.  It's the best ever rich chocolate cake so far judged by my husband, he actually ate two big slices in one go, very naughty! I guess we should act like a devil sometimes!

For the left-over cake, simply heat up in the microwave, the ganache melted to be a fudge topping, serve with some ice-cream will be a great winter dessert. I'll recommend using Lighthouse's self-raising flour and Cadbury's cocoa for the recipe, they work well together and the cake is moist and soft!

See you soon, good health to you all!

Devil's Food Cake II

Ingredients:
1 cup Lighthouse cake & biscuit self raising flour
1 cup caster sugar
1/2 cup Cadbury Bournville cocoa
1/2 teaspoon bicarbonate soda
120g dark chocolate
200 butter, diced
3 eggs, beaten
3/4 cup milk

Chocolate Ganache:
150g milk chocolate
25g dark chocolate
1/3 cup plus 1 tablespoon thicken cream

Methods:

  1. Preheat oven to 170c (150c fan-forced), line a 20cm round cake tin with baking paper.
  2. Sift the flour, sugar, cocoa and bicarbonate soda into a mixing bowl until mixed through. 
  3. Melted butter and chocolate in a double boiler over simmering water.  Let cool slightly.
  4. Add the eggs, milk and chocolate mixture into the dry ingredients. Stir till well combined.  Pour the cake batter into the cake tin and bake for 40 minutes or until the skewer comes out clean after inserting into the cake.  Let the cake cool for a few minutes in the tin before transferring to a wire rack.
  5. To make the ganache: add chocolate and cream in a double boiler over simmering water until smooth.  Cool the chocolate mixture into the fridge until it becomes thick and spreadable.
  6. Decorate the chocolate cake with the ganache.


Wednesday, May 29, 2013

Not Quite High-Hat Cupcakes


I got this recipe from my daughter through an email with a title of "Make this".  We don't leave apart and in an actual fact, her room is right next to mine.  This is the modern way of talking to each other, I guess!

I made it for her 16th birthday, a very sweet cake for a sweet 16! It was a bit too sweet for everyone but just let it be sweet .... leaving us a sweet memory!

I should have watched the video on how to ice the chocolate icing beforehand because the high hat shrink and I much prefer icing with dark chocolate than milk chocolate! Overall, I am please with the result, at least it's edible! I think it's a beautiful cupcake, don't you?

There are two versions of the recipes from Martha Stewart's High-Hat Cupcakes, I use version 1, please check the recipe and video here, and version 2 uses commercial cake mix and the frosting don't use almond essence, whether it's better or not, I'd have to make it to find out. Please click here for version 2 recipe.


Saturday, May 4, 2013

Hummingbird cupcakes with marmalade icing


I made these cupcakes due to two mistakes, first I bought the wrong type of tinned pineapple for making pizza, second I poured 5 times more crushed pineapple into the cake batter instead of the required amount.  These sound like a kitchen disaster was approaching.....

I used the pineapple for the pizza anyway and it was not too bad.  Then the rest of the tin had to be consumed and I remembered there was a recipe of hummingbird cupcake using it.  The last time I made this cake, it didn't really reach my expectation, it's probably the recipe's fault. It also need a lot of ingredients to make this cake that you really need a plan to shop all the things you need.  So here we go, I'm just lucky to have all the ingredients at home, including the ripe bananas.

With a high hope of having another round of a trial of the recipe, I ended up with a puddle of cake batter by adding too much pineapple.  Should I add more ingredients to make more cupcakes or should I add more flour to thicken the batter?  The later option was a good choice as the cupcakes came out moist with a good balance of flavour.  My husband loved it and asked me what's in the cake, he named a few but couldn't name them all... so I bet him and won the game of naming ingredients.

Most icing for hummingbird cake used cream cheese, this one used homemade marmalade with whipped butter cream and that was the killer part of this cake!  It would be a great cake to serve at a high tea on Mother's Day!

Have you ever make something amazing by mistake?


Hummingbird cupcakes with marmalade icing

125g plain flour
125g self-raising flour
1 teaspoon baking powder
1/2 teaspoon cinnamon
125g caster sugar
115ml sunflower oil
2 eggs
150g mashed banana
1 1/2 tablespoon grated orange zest
60g grated carrot
60g desiccated coconut
440g tin of crushed pineapple

For the icing:
58g unsalted butter, softened
75g icing sugar, sieved
1 tablespoon orange juice
1 tablespoon marmalade

Method:

  1. Preheat the oven to 175c. Place the muffin tin with paper cases.
  2. Beat the oil and sugar till creamy than add in one egg at a time and beat until well mixed.
  3. Add in sieved flour, baking powder and cinnamon into the egg mixture and stir.  Then add in the rest of the ingredients and stir till combined.
  4. Spoon the batter into the cases until 3/4 full.  Bake for 25 minutes or until cooked.  Cool the cake in the tin for 5 minutes.
  5. Remove the cupcakes and cool the cake on a rack before icing.
  6. For the icing: beat butter and icing sugar till light and fluffy, add the orange juice and marmalade and stir.  Smear the icing onto the cupcakes before taking a big bite!


Thursday, March 7, 2013

White Chocolate Fairy Cupcakes


Princesses and fairies, didn't we grown up from these lovely imagination?  When my daughter was little, she would wear her princess dress and crown to the shopping centre.  Everyone would waved at my little SnowWhite.  Her dress up box were filled with costumes, fairy wands and wings.  When her little friends came over for a play, they all dress up and became princesses or fairies from the far far away land.

I also become the fairy, the tooth fairy when my kids lose their baby teeth.  Kids wake up in the morning would find their teeth replaced by gold coins.  One time, my daughter lost her tooth into the drain while brushing her teeth. We wrote a little note to the tooth fairy to explain everything and luckily she found it and a gold coin was rewarded.  I often told them to brush their teeth probably because bad teeth would be taken by goblins.  I would soon retired from being the tooth fairy as my daughter had grown up and my son only has a few teeth to lose.  However,  I probably will be the Easter buddy and Mrs Santa for a long  time.

This white chocolate fairy cupcake had brought back many sweet memories to me..... and I made them for one of our staff's birthday because she had been a sweetheart to us.


White Chocolate Fairy Cupcakes
(make 12)

125g butter, softened
125g caster sugar
2 eggs
1 teaspoon vanilla essence
125g self-raising flour
75g white choc chips
1 tablespoon milk

Topping and filling:
strawberry jam
thickened cream, whipped
strawberries, halves
edible glitter
mini sugared love hearts

Method:

  1. Preheat oven to 190c. Place paper cases into a 12 hole muffin tin.
  2. Beat butter and sugar until light and fluffy, add beaten eggs and vanilla essence until well mix.
  3. Add in sifted flour and fold it into the mixture, stir in white choc chips. Add a tablespoon of milk or a little more to make a soft, dropping mixture.
  4. Spoon the mixture into muffin cases until 2/3 full.  Bake for 15 minutes or until a light golden brown.
  5. Cool in wire-rack.  When the cake is completely cooled, use a knife to cut along the top of the cake, take the top out and fill the inside with strawberry jam and cover the top.
  6. Pipe the cream onto the cake starting from the side of the cake, topped with strawberries or love hearts, then sprinkle with glitter. Magic may be coming on its way!


Wednesday, February 27, 2013

Banana cake to share with my neighbour


This banana cake is so moist and you must use four cavendish bananas and not less for the recipe.  I've used two bananas or added chopped walnuts and it got too dry or too lumpy to eat.  The best is to add a few walnuts on top and keep it as simple as it is.  Nice to go along with a cuppa and it really remind me of the banana cake we had in Hong Kong.

I took this freshly baked cake to visit my neighbour for morning tea.  He was diagnosed with a very rare cancer and undergoing chemo. His taste buds were gone but he could taste the bananas of this cake.  I'm so pleased that he enjoyed my baking. It's only a little thing I could do to cheer him and his wife up. His wife had just recovered from cancer a few years ago and they decided to retire and enjoyed life a bit more. Unfortunately, bad luck has come along for them! Let's hope thing will get better for them after the treatments and God bless for them.
 

Simple Banana Cake

4 ripes bananas, mashed
1 1/2 cups plain flour
1/3 cup butter, melted
3/4 cup brown sugar
1 egg, beaten
1 tsp vanilla essence
1 tsp bicarbonate of soda
1/4-1/2 cup milk
a pinch of salt
3 walnuts (optional)

Method:

  1. Preheat the oven at 175c. Sift plain flour and bicarbonate of soda in a bowl.
  2. Combine butter, egg, sugar and vanilla in another bowl, add the mashed banana, milk, salt, then add the flour mixture.  Stir till well combined.
  3. Pour the mixture into a paper lined loaf tin. Top cake with three walnuts.  Bake for 45 minutes or until the skewer comes out clean after inserting into the cake.
Source: banana cake from Christine's Recipes


Sunday, December 2, 2012

Strawberry Devil's Food Cake


It has been two years since I decide to bake birthday cake for my family.  I really regret that I do not make cakes for my kids' first birthday and all these years relying on buying cakes from the store.  Cakes from the bakery may taste better or look nicer, however home bake cake is always special that you make it with your heart! Don't you agree!

I have been longed to make Devil's food cake so I take the chance to make it for my son's birthday as chocolate is his favourite! He also love strawberries and it is such a good match to the chocolate.

The name of angle food cake comes from the white colour from the egg white while devil's food cake comes from the dark colour from the chocolate.  It is interchangeable with rich chocolate cake, the only different is that it is made with soda bicarbonate and water (my recipe used soda bicarbonate and milk) Originally it is made with grated beetroot to get the red colour so some recipes would add in red colouring as well.  So it is quite liked the red velvet cake with dark frosting!

My kids has started the summer holiday and we'll be going to Sydney for a wedding next week!  I'm so looking forward for a break!!


Strawberry Devil's Food Cake

90g dark cooking chocolate
115g unsalted butter
90g dark brown sugar
1 tablespoon golden syrup
175g plain flour
25g cocoa powder
1/2 teaspoon bicarbonate of soda
2 eggs
1/2 teaspoon vanilla essence
90ml milk

For the icing:
150ml milk
100g caster sugar
60g dark chocolate
60g butter
1/2 teaspoon vanilla essence
fresh strawberries and chocolate flakes

Method:

  1. Preheat oven to 170c and paper-lined a 20cm round cake pan.
  2. Melt butter, chocolate, sugar and syrup in pan, let it cool aside.
  3. Sift dry ingredients into a bowl, then add the chocolate mixture, stir in beaten eggs, vanilla essence and milk.  Mix well.
  4. Bake 30-35 mins or until the skewer comes out clean after inserting. Cool cake at the cake wire.
  5. For the icing: boil milk and sugar until syrupy, it will look like thinned condensed milk.  Do not stir once the sugar is dissolved. Remove from pan and stir in chocolate, butter and vanilla essence.  Beat until thick, keep the icing mixture into the fridge until spreadable.
  6. To Deco the cake: cool cake completely, spilt the cake into half horizontally. Spread 1/3 of the icing on the top of the first layer, then lay around with sliced strawberry.  Top with another layer and spread the rest of the icing on the top and side of the cake.  Sprinkle some chocolate flakes over and deco with some fresh strawberries in the middle.  Keep cake in fridge till the icing is settled.
Source: Adopted and modified from the cookbook "Easy Baking - Cakes, biscuits, pies & bread" from Linda Collister


Friday, November 16, 2012

Orange Chiffon Cake


I have given up making chiffon cake years ago as I never be able to make a good one.  It is such a simple looking cake without icing and what you only need to succeed making it is to get the airy texture and stay in shape.  Overlooking my failure is due to not having the right baking tin and good recipe.  My luck finally comes after searching through the internet and get a few tips, then combined two recipes to make this first ever so called a "passed" chiffon cake! (Well, it has been few hours after making the cake and it is still in good shape)  The tip to achieve a good result is to invert the pan on the cake rack and leave it cooled before release the cake from tin.  The gravity helps to keep the cake in shape.

Many people said that chiffon cake was liked angel food cake (one of the cake I've never made either).  The cooking steps are very much the same except that angel food cake is cooked without oil and egg yolk.  Chiffon cake is very poplar in Asia as many Asian prefer vegetable oil than butter as used in most western cake.  When I went to Malaysia the first time, I found out that many of their cakes are green in colour.  My husband told me that they were pandan cake which use pandan leaves to make the juice to give the fragrant and colour as what they called Asian vanilla.  As pandan leaf is not easy to get here and my husband is never happy with the taste of pandan essence, I choose to use orange flavour this time.

Although Asian has created many flavours in chiffon cake, it is actually created by an American Insurance Agent, Harry Baker in 1927 and he kept the recipe as a secret until he sold it to General Mills in 1947.  He must be very determined to keep a secret for 20 years and make a profit from it.  If you're interested in the history of chiffon cake, please click here.

Orange Chiffon Cake

Egg yolk mix:
5 egg yolks
20g caster sugar
100g cake flour
1 teaspoon baking powder
60g orange juice
1 tablespoon orange rind
3 tablespoon vegetable oil

Egg white mix:
5 egg whites
80g caster sugar
1/2 teaspoon cream of tartar

Method:

  1. Preheat oven at 170c.  Beat egg yolks with sugar, add oil and mix well.  Stir in orange juice, rind and sifted flour and baking powder.
  2. Beat egg whites with electric mixer until frothy, gradually add in sugar and cream of tarter in 2 batches. Beat until stiff.
  3. Fold egg white into flour mixture in 2 batches.  Pour mixture in a lightly greased tube pan (some say don't grease the pan but I still grease a little, just in case the cake got stuck) Tap the pan at the kitchen bench a few time to release bubbles.
  4. Bake about 35 to 40 minutes.  Gently invert pan on cake wire and leave cool.  Run a spatula around side of pan to release cake. 


Friday, October 5, 2012

Almost a Vegan Chocolate Cupcake and Pink October


A little while ago I went to a friend's birthday party and tried her daughter's vegan cupcakes and vegan birthday cakes.  It looks not much difference to the other non-vegan cakes and it tastes moist and nice.  I like the glossy shine of her icing using extra virgin coconut oil which you won't get from any other kinds of oil.  I always think that vegetarian are good cook as normal restaurant may not meet their needs, and they have made their life healthy and be kind to the animals.

I search the recipes for the vegan cupcake and frosting from the internet.  I decide to use butter and milk for my frosting as I know the name of vegan cupcake may scare my family away.  The rich ganache goes well with the light moist cake, so next time when you want to make a cake but there are no eggs in the fridge, try this vegan chocolate cake.  It won't make you disappointed!


October is dedicated to bring the awareness for breast cancer, I would like to take this opportunity to ask you to do a simple thing.  Do a self breast examination and keep it as a monthly routine.  If you're over 40, take a mammogram and ultra-sound for your breasts.  If there is any suspicious lump or discharge from your nipples, seek for medical advice without hesitation.  Don't ask your husband as they just don't know!  I have been through that and it's only early detection can saved your life.  Breast cancer don't only happen to old people or a particular race!  Let us all beat the cancer and support those that are having treatment be well and healthy soon!


Please share this message with your girlfriends to bring out more awareness of breast cancer!


Vegan Chocolate Cupcake

1 1/4 cups plain flour
3/4 cup castor sugar
1/4 cup brown sugar
1/3 cup cocoa powder
1 teaspoon baking soda
1/2 teaspoon salt
1 cup warm water
1 teaspoon vanilla
1/3 cup vegetable oil
1 teaspoon apple cider

For the ganache:
1 cup dark choc chips
1/4 cup evaporated milk or more if needed
2 teaspoon butter or margarine
1/2 cup icing sugar

Method:

  1. Mix dry ingredients in a bowl.  Then mix the wet ingredients in another bowl.  Pour the wet ingredients into the dry ingredients and mix well.  Spoon the batter into cupcake cases and baked about 30 minutes in a preheat oven at 180c.
  2. For the ganache: Microwave the choc chips and butter in a bowl, add the evaporated milk and icing sugar.  Stir until the frosting is well mixed, add a little bit more milk if needed to get the right consistency.  Garnish the cake with some coloured choc chips.
Source: http://www.instructables.com/id/The-BEST-chococlate-cake-ever...that-happens-to-be/
             http://www.theyummylife.com/Chocolate_Frosting


Wednesday, October 3, 2012

Blueberry Muffins and Pink October


If you have tried to bake with fresh blueberries then you'll know the difference between the fresh and the frozen one.  You won't get the cloudy blue in the batter with the fresh one.  Blueberry is high in anti-oxidiant with many health benefits and my favourite recipes for blueberry include blueberry pancake with maple syrup and blueberry with yoghurt and muesli.

My blueberry trees are blooming and when fresh blueberry is available, I alway make blueberry muffin as you know the fresh one always taste the best!  I make this muffin using the recipe of my first post apple and cinnamon muffins, please click for recipe.  I use it as a base recipe for various muffins, simply substitute the apple for blueberries.  The other good combination is mixed berries with white chocolate.  One of the blogger mentioned that muffin was liked a country girl (true and honest) and cupcake was liked a city girl. (dressing up)  Which one do you prefer?

October is dedicated to bring the awareness for breast cancer, I would like to take this opportunity to ask you to do a simple thing.  Do a self breast examination and keep it as a monthly routine.  If you're over 40, take a mammogram and ultra-sound for your breasts.  If there is any suspicious lump or discharge from your nipples, seek for medical advice without hesitation.  Don't ask your husband as they just don't know!  I have been through that and it's only early detection can saved your life.  Breast cancer don't only happen to old people or a particular race!  Let us all beat the cancer and support those that are having treatment be well and healthy soon!


Please share this message with your girlfriends to bring out more awareness of breast cancer!


Tuesday, July 31, 2012

To celebrate my blogiversary with the Cafe au Lait Choc Cake and an Award


So I have made it, my 2nd year of blogging.  For the past few months, I have been trying to seek for other interests besides blogging.  But I find that blogging has become a part of my life, it is such an easy way to share recipes with my family and friends, and meeting like-minded people.  It is your comments that keep me going, it is your inspiring recipes that keep me logging in...so I'm still here to share what I cooked in my kitchen, what I feed my family and what makes me happy.  I may not be able to read and comment your posts all the time but I do enjoy it when I have the chance.  If you want to connect with me at facebook, please click a like at my page here.

I baked this cake for my daughter's birthday as she loves everything french.  It is a lovely cake for celebration and only if I have some cachous (little silver balls) could make this cake even more beautiful!  I hope you like it!

I received this award from Andrea at Get Your Feast On just before my blogiversary.  Andrea has the interests in cooking and fashion and she has combined both of these elements in her blog.  I started blogging when I stayed home to recover from illness, so every blogiversary also mean another year of good health to me.  When I received my first award, I feel the satisfaction of the hard work I've done.  Therefore, I decide to give this award to any blogger(s) that has not received an award yet.  Simply grab it, pass it on and follow the rules below if possible and enjoy blogging delicious food!

The rules are: 
  • Thank the person who nominated you and link them back. 
  • Share a little bit about why you started blogging.
  • Copy and paste the award onto your blog. 
  • Nominate up to 10 other bloggers you think are addictive enough to deserve the award.


Thanks again for your friendship to accompany my journey of cooking!

Cafe au Lait Choc Cake


1/2 cup cocoa powder
1 cup strong coffee (I use 2 teaspoons instant coffee powder mixed with 1 cup hot water)
2 1/4 cup cake flour
1 1/2 cups caster sugar
1 tbsp baking powder
1/3 tsp salt
3/4 cup butter, softened
3 eggs
2 tsp vanilla essence

For the coffee cream:
300ml thickened cream
icing sugar
1-2 teaspoons instant coffee powder mixed with 1 tbsp hot water

For the chocolate leaves and decoration:
white chocolate
dark chocolate
rose leave
rose petal
a rose

Method

  1. Beat butter with sugar until creamy and fluffy.  Add eggs one at a time and mix well. 
  2. Add coffee to the butter mixture. Stir in sifted flour, cocoa powder, baking powder, salt and vanilla essence.
  3. Pour mixture into a paper lined 23cm round tin and bake 25-30 minutes at 180c.
  4. Spilt cake into half, filled and decorate with coffee cream and chocolate leaves. Decorate the side of the cake with chocolate rose petals and topped the cake with a rose.
  5. For the coffee cream, whip the cream till thicken then add in few tablespoon of icing sugar.  Then mix well with the coffee mixture.
  6. For the chocolate leave and rose petal: melt chocolate in microwave at medium heat until smooth.  Use a paint brush to brush some chocolate onto the leaves or paint 1/2 of the rose petals.  Leave the chocolate to harden in the fridge if needed.  Then peel off the leaves and decorate as you wish. Don't need to peel for the rose petals.

Source: adopted and modified from the cookbook, "Great Cake" published by the Country Living.


Wednesday, June 20, 2012

Food for the Gods


My son has been learning Ancient Egypt at school.  They have an archaeological dig at the school ground digging up some old cup and saucers, broken metal and materials that are buried by the teachers.  Then they visit the museum looking at the mummy and some Egyptian artefact followed by writing reports on what they find and what the life's liked during the ancient period.  That is a fun way to learn about history rather than reading and try to remember the fact like what I used to.  As they had been learning Ancient Greek and Roman before and I didn't know much about ancient history except the Chinese's.  So I borrow some books from the library on ancient history about the Egyptian, the Greeks, the Romans and the Vikings.  I am just amazed how the ancient time influences what we are today particularly in heath and medicine, and in art and architecture.  As the world is becoming globalized and you just wonder where things actually originally come from.  There is never too old to learn new things. (even history is old thing)

I went to the biggest morning tea, a fundraising for the caner council yesterday and I baked this cake to share with the ladies.  A lady came to me and ask for the recipe straight away.  I couldn't find out the meaning for the name of this cake and I assume that there are many Gods an Goddess in the ancient time and sugar is very precious.  The Egyptian uses grape and date to make wine and I just assume that they also use date and honey to make cake to pray for their Gods.  Or I think the cake just taste liked heaven to me!

I got the recipe from ping's picking and I have slightly changed some of the ingredient.  Please check out Ping's blog as she has many amazing recipes to offer.


Food for the Gods (Date & Walnuts Slice)


Ingredients
1 1/4 cup plain flour
1/2 tsp baking powder
1/2 tsp baking soda
1/4 tsp salt
225g butter, softened
2/3 cup brown sugar
3 eggs
1 tbsp golden syrup
1 tbsp honey
1/2 tsp vanilla essence
1 cup walnut, chopped
1 cup pitted dates, chopped

Method

  1. Beat butter and sugar until creamy. Add in eggs one at a time and mix well.
  2. Add sifted flour, baking powder, soda, salt, golden syrup, honey, vanilla, nuts and dates to the mixture and mix well.
  3. Pour mixture into a paper lined lamington pan and bake for 20 min at 170c.
  4. Cool cake in pan and cut into slices.