Saturday, August 6, 2011

Passionfruit Coconut Cake


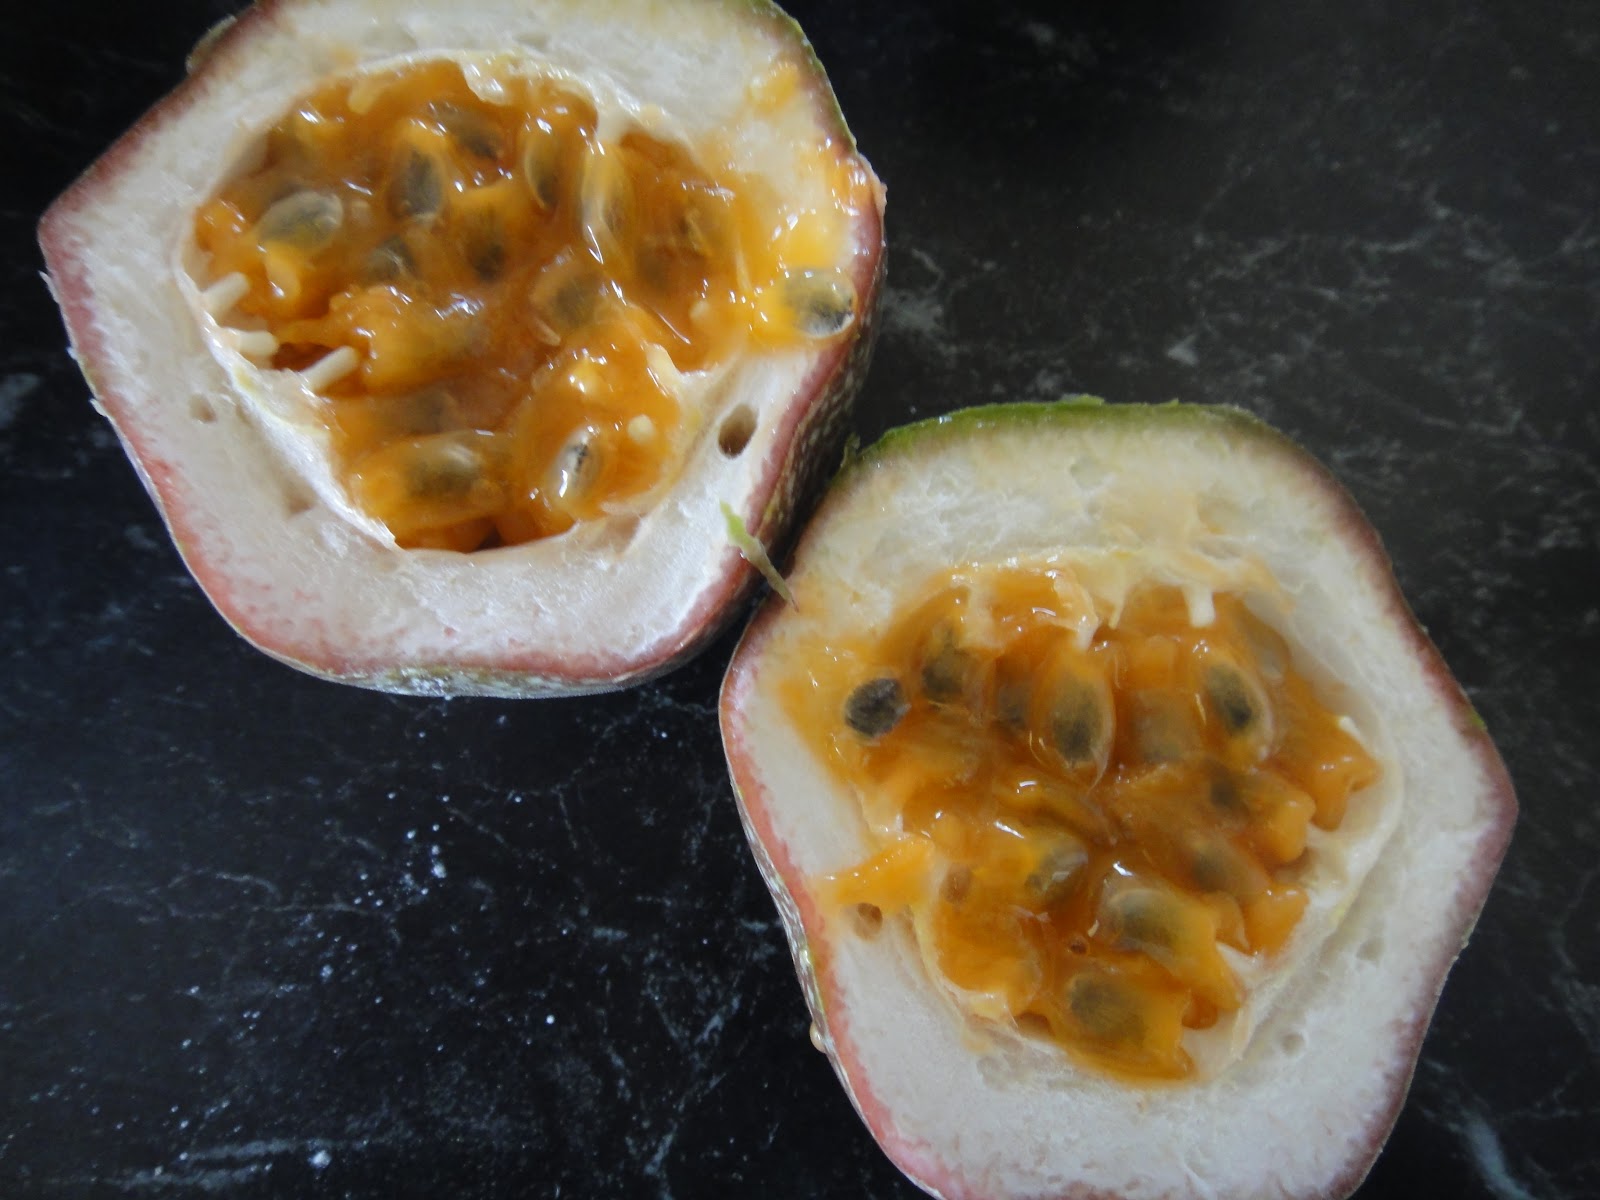
I had never seen or eaten passionfruit until I came to live in Australia.  The first time I had passionfruit I didn't really like it as I didn't like chewing the seeds.  Then my school mate told me to swallow it without chewing it.  I was a bit hesitated as my grandmother told me when I was a kid that the seed would grow into a tree in my tummy if I swallowed it.  One time, I was so worry that I couldn't sleep when I accidentally swallowed some apple seeds.  That was a bit of a nightmare!  Anyway, the seed of passionfruit is eatable and it is a good source of fibre.   I start to fall in love with this fruit as the tangy sweetness and aromatic of the pulp is unbelievable good.  It always make me feel good and relax similar to the feeling of eating chocolate.  I enjoy eating the fruit, using it for icing, juicing, topping for pavlova and pouring it onto ice-cream.....mmmm, yum!

Passionfruit is now available in many countries.  If you still haven't tried it, you should go and try one now!  For more information about passionfruit, please click here

This cake is an easy and simple cake that anyone can do it.  I like its tropical taste with coconut.


Passionfruit Coconut Cake
(make 16 slices)

Ingredients:
125g butter, melted
1/3 cup honey
1 cup milk
2 eggs, beaten
2 cups self-raising flour
1/2 cup desiccated coconut
1/4 cup caster sugar
2 passionfruit

For the icing:
25g butter, soften at room temperature
1 1/2 icing sugar
2 passionfruit

Method:

  1. Preheat oven to 180c.  Line a 20cmx30cm lamington pan with baking paper.
  2. Melt butter and honey in a saucepan, leave cool.
  3. Add milk, eggs, sifted flour, coconut, sugar and passionfruit pulp into the butter mixture until well combined. (don't over mix)
  4. Spread the mixture into prepared pan and bake for 20-25 minutes.  Cool cake in pan.
  5. Combine butter and sifted icing sugar in a bowl.  Add in passionfruit pulp until the mixture is spreadable.  Spread icing to cooled cake.  Cut cake into small pieces when the icing is set.
Source: Super Food Ideas, Nov 08 Issue 98

Thursday, August 4, 2011

Tips for pastry making


I have to admit that I only use ready-made pastry to make pie and tarts.  I alway find that making shortcrust pastry is too hard and time consuming.  I don't even dare to dream of making my own puff pastry.  Then things change when my mother-in-law spent Christmas with us last year and I saw her making a homemade turkey pie from step-by-step.  Once when you have tried making your own pastry, you could get addicted to it and it is such a satisfying and rewarding experience.  It tastes better and it costs less too!

I'm still a new learner from pastry making but I'd like to share some pastry making tips from my readings from cookbooks for future references.

Choosing equipment and utensils

  1. A food processor is a must if you have hot hands as it mixes fat and flour evenly.  Make sure using "pulse"motion when adding liquids so that the dough will not be overworked and become tough.
  2. Good solid baking sheets that won't buckle in the oven is important.  When choosing tart tins with removable bases, the heavier the better as the pastry will cook more evenly.  China and glass dishes give the dreaded soggy bottom.
  3. Traditionally, fluted edges designated for sweet fillings and plain edges for savoury filling. 
  4. A pie plates with a wide rim make a good crust for decorative edges.
  5. There are varies pans such as tarte tatin pan, springform tins, patty tins, tarlet tins, mini muffin tins and Yorkshire pudding tins for special baking needs.  It's good to collect some of those in the pantry.
  6. A marble slab to keep the pastry cool to work with if you need one.
  7. Ceramic pie weights or dried beans, rice and pasta are needed for baking blind.
Tips for pastry making
  1. The utensils and ingredients should be cold.  The butter should be hard and cut into medium sized cubes to blend with the flour in the processor until the mixture resembles coarse breadcrumbs.  
  2. If mixing by hands, use only your finger tips and handle quickly and lightly to trap as much air as possible by lifting your hands high above the bowl and let the mixture fall back into the bowl through your finger tips.
  3. Keep pastry board and rolling pin lightly dusted with flour to prevent sticking.  Brush off excess flour as too much flour is used making the pastry hard.
  4. Water used in mixing must be very cold.  Pastry should be moist enough to handle without sticking to the hands.  
  5. Roll pastry from centre outwards giving dough a half turn each time.  Never roll dough back and forth as this stretches pastry.
  6. Rolling pastry directly on a piece of non-stick baking paper or cling wrap will help to prevent sticking.  If the pastry becomes soft, wrap in baking paper and place in the fridge before rolling out.
  7. Use a sharp knife to trim pastry to get a clean edge.  Don't roll it too thin if you're beginner, just cook it a bit longer when you bake it blind.
  8. There is no need to grease a tin before lining as there is sufficient fat in the pastry.  You can sprinkle some flour at the base of the pan.
  9. To prevent pastry becoming soggy, brush bottom of pie case with egg white before baking.  You can scatter some bread or cake crumbs over the base to absorb some moisture from the filling.  Filling should be cooled before putting into the pan.
  10. Baking blind means to partially or fully bake a pastry shell before filling with a mixture to prevent soggy bottom.  Line pastry with baking paper, weighted down with pie weight or dried beans to prevent it rising during cooking.
  11. Pastry needs a hot oven so always have your oven pre-heated.  The contract between cold pastry and the hot oven causes air trapped in the dough to expand quickly, giving a crisp, light pastry.  Do not open the oven door at least after 5 minutes the pastry has been put in.
  12. Use beaten egg yolk for glazing any savoury pastry and brush egg white and sprinkle sugar on top for sweet pastry.
  13. If in doubt, chill the pastry as it helps to make crispy pastry.
  14. Practise makes it perfect!  Keep looking for good recipes! 
Source:1. The CWA Cookbook - 70 years in the Kitchen
            2. Tarts - sweet and savoury by Maxine Clark

Passionfruit friands


One of the terrible thing about winter is getting the flu, lying in my sick bed for 2 weeks with two courses of anti-botics is nothing I would wish for.  Everyday I just hope that I'll feel better so I could enjoy Good Food, Great Love and have a Good Laugh again.  As we have such as long winter this year, I truly welcome Spring to come in September.

I have got some egg white left from the strawberry vanilla tart I have made previously.  It just fitted perfectly into the recipe of this almond friands.  I actually bake this while making the tart pastry so I end up with two desserts in one cooking day.  I always wonder how it tastes like when I see them at the display window in the cafe.  The reason I never order one as I  would go for something more complicated looking.  After baking and tasting it, I can tell you that friands may look simple but it doesn't taste plain at all.  It is rich in butter and taste heavier than muffins.  I add in some passionfruit as my passionfruit tree has yielded so much fruit this year, thanks to the heavy rainfall we have last summer.

Other than passionfruit, I also have some good harvest of cherry tomatoes, pumpkins and papaya from my garden.  The blueberry trees are blooming with flowers and I am looking for some fruit very soon before my dog eats them.  The pile of cooking magazines I have been buying from the supermarket checkout has been building up and it has some nice recipes of seasons fruit.  What's the point of buying them and not using the recipes?  In August, I'm working on the those magazines for the seasoned fruit.


 Passionfruit Almond Friands

Ingredients:
6 egg whites
185g butter, melted
1 cup almond meal
1 1/3 cups icing sugar
1/2 cup plain flour
2 passionfruits

Method:

  1. Preheat oven to 200c.
  2. Place egg white in a mixer until stiff, fold in butter, almond meal, shifted icing sugar and flour until just combined.  Add in two passionfruit pulps.
  3. Pour mixture into friands pan or cupcake cases, bake 25 minutes.  Dust with icing sugar when the cake is cool.
Source: Australian Women's Weekly - Mix: cakes, muffins, biscuits + pudding


Sunday, July 31, 2011

Cherrimisu in a Glass and blogiversary


Today is my blogiversary and I'm celebrating it with cherrimisu in a glass.  Over the past year, it has been wonderful meeting new friends and inspired by you guys.  If I have not started blogging, I may not be able to step out of my comfort zone and cook all the dishes I have made and I may still serving my family with the same things over and over again (there's nothing wrong with that but I think cooking new dish is more interesting)  This is my 86th post and when I reach my 100th post, I will pass on the two rewards given by Elisabeth from Food and Thrift Finds to other well deserved people.  Thanks for your friendship and kindness for supporting this blog!  XOX

Cherrimisu in a Glass
(make 4)

Ingredients:
250g mascarpone cheese
1 teaspoon vanilla essence
150ml strong coffee made from 1 heap teaspoon of coffee power and hot water
150ml thicken cream
3 tablespoons Kahlua
4 tablespoons of icing sugar
3 tablespoons extra icing sugar
16 sponge fingers
12 fresh cherries
grated dark chocolate

Method;

  1. Whisk the mascarpone cheese with vanilla and Kahula with 50ml of the strong coffee.  Whisk the cream with icing sugar in a separate bowl until thicken, then fold in with the mascarpone mix.
  2. Sweeten the remaining coffee with extra icing sugar if you wish, then pour the mixture into a bowl.
  3. Break one of the sponge into three equal pieces.  Soak it with the coffee mixture than put it into the centre of the glass.  Then break three more sponges into half this time and line them around the side of the glass after soaking with the coffee mixture.  Repeat the process for the rest of the three glasses.
  4. Pitted 8 of the cherries and cut into quarters.  
  5. Spoon a little of the mascarpone mix into the centre then top with the cherry pieces.  Spoon more mascarpone mix to cover the cherry and fill up the glass.  Top with grated chocolate and garnish with a cherry on top.  Fridge for 2 hours before serving.


Monday, July 25, 2011

Strawberry Vanilla Tart


Instead of staying in bed with a bad cold, I think I should get up to work on the computer.  Couldn't remember the last time I logged into blogger but there are so many new posts of yummy dishes from my blogging friends.  I guess if I don't change, the world still changing so I got to keep up...

I have been collecting tart tins and baking equipments at the moment so I can try to make some of the pies and tarts I always want to make.  I got very excited with my first oblong tart tin.  After I made this french dessert, I realise I don't have a plate long enough to fit it in.  I'm using my bread board until I find a plate to fit it properly.

Strawberry Vanilla Tart


For the pastry:
200g plain flour
75g caster sugar
75g butter
2 egg yolks
1/2 teaspoon vanilla essence
pinch of salt
2-3 teaspoon s of iced water

For the custard:
4 egg yolks
75g caster sugar
25g plain flour
300ml milk
1 teaspoon vanilla essence
2 tablespoons kirsch

For the topping and glaze:
450g equal sized strawberries, sliced
75g fresh strawberry, chopped
1 tablespoon caster sugar
5 tablespoons water
1/2 teaspoon gelatine mixed with 2 tablespoon hot water

Or replace the glaze with 1/3 cup strawberry jam stirs with 1 1/2 tablespoon water under low heat

Methods:

  1. For the pastry: Put the sugar, butter, egg yolks and vanilla into a food processor and blend until smooth.  Add the cold water and blend again then add in sift flour and salt.  Use "pulse" action and blend until the dough is just combined.
  2. Transfer the dough to the working space lined with baking paper and dusted with a little flour.  Knead gently until the dough is smooth and not sticky.  Cover it with wrap and put into fridge for half and hour.
  3. Dust the rolling pin with a little flour, then roll the dough into thin long shape to fit into the oblong tart tin.  Wrap up a little of the extra dough with plastic wrap and press along the side of the edges.  Use a fork to prick some holds at the base and chill for further 15 minutes.
  4. Preheat the oven at 180c, line the base with baking paper with pie weight.  Bake blind for 15 minutes.  Remove the paper and pie weight and bake a further 10-15 minutes.
  5. For the custard: beat egg yolks and sugar until pale and thick, add in flour and vanilla.
  6. Bring the milk to boil in a saucepan then pour in the egg mixture and stir constantly.  Cook gently in low heat until a few minutes until the custard is thicken.  Add in kirsch and let it cool completely.
  7. Pour the custard over to the tart tin and spread evenly.  Lay the top with sliced strawberries and glaze.
  8. For the glaze: Combine the strawberries, sugar and water in a small saucepan, let it simmer for a few minutes or until the strawberries become tender.  Blend the mixture into a puree and add in the gelatine mixture.  Return the puree into the pan and stir until it thickens. 
  9. Keep the tart into the fridge for 4-5 hours until the custard is set and the flavour develops. 
Source: adopted and modified from "Tarts Sweet and Savoury" by Maxine Clark


Wednesday, July 20, 2011

Custard Tart


Many people may have heard or have had Hong Kong's egg tart already.  Some may have already master  how to make this delicious food.  There are a few different types of egg tarts, one of it has a shortcrust pastry that usually sell in bakery.  The other one has puff pastry that is sold at Yum Cha in Chinese restaurant.  When I first come to Australia, we find custard tart selling in the bakery that look and taste so close to Hong Kong's egg tart except the one in Australia is larger.   As Hong Kong and Australia are both Commonwealth countries, I believe that British has the influence in the creation of Hong Kong egg tart.

Talking about Britain, I have just got an emil saying I have won 1 million pounds from the British Lottery but I need to give some of my personal details to this yahoo email.  I have not purchased any lottery ticket so how could I win this...... wouldn't it be nice to win a million!

This recipe is taken from the book "a passion for pastry" again and it is the recipe given by Grace Henderson.  I am not going to put this post up because ready roll shortcrust pastry really not as tasty as homemade pastry.  However, it is so easy to make if you are craving for a quick dessert.  On the other hand, it's also difficult to get the floral shape right if you are making your own shortcrust pastry.  My son takes one for school and he gives a piece to his friend.  His friend asks where does he gets it and the answer is homemade by his Mummy.  So, if my kids and his friends like it, it should be OK!  My kids eat around the crust, then take a deep bite into the middle, that's not bad as they say. 

Custard Tart
(make 8)

2 sheets of shortcrust pastry
2 large eggs
25g caster sugar
a few drops of vanilla essence
150ml milk
nutmeg

  1. Preheat oven to 200c.  Cut a piece of pastry into 4 equal size squares.  The recipe asked to be 10cmx10cm and I have mine 12cmx12cm.  Repeat for the other pastry.
  2. Grease 8 muffin holes if needed.  Push the pastry into the hole with four corners poking upward like petals.  Bake for 10 minutes then remove it from the oven.
  3. While the pastry is cooking, beat together the eggs, sugar and vanilla essence.  Heat the milk until almost boiling, then stir briskly into the eggs.  Strain into a bowl then pour into the pastry cases.  Sprinkle some nutmeg over the top.
  4. Bake for 15-20 minutes or until the custard is set.


Monday, July 18, 2011

Steam Boat


Having steam boat in winter is the best thing to keep you warm and entertain with family and friends.  You need a portable gas stove, a pot with your choice of soup base, different kinds of seafood, fish balls, meat, tofu, vegetables and noodles.  Then every thing is cooked at the table, nice and hot straight from the pot to your mouth with every one crowding at the table, standing or sitting.  In Hong Kong, there are restaurants specially cater for steam boat.  When I was a kid, we only had this in winter.  Nowadays people are having it all year round with the air conditioning on during summer.  You can see how much Chinese love steam boat.

My kids love this as they can cook whatever they want for themselves.  I have used two soup bases, laksa and miso this time to suit my family's taste.  For me, it's the best food to have in winter.  What's your winter favourite?